<?xml version="1.0" encoding="UTF-8"?>
<feed xmlns="http://www.w3.org/2005/Atom">
	<title>Victor Schubert’s personal page</title>
	<link href="https://schu.be/feed.xml" rel="self" />
	<link href="https://schu.be/" />
	<id>https://schu.be/</id>
	<updated>2024-08-02T14:39:41+02:00</updated>
<entry>
<title>Connecting a website to native software with Node.js</title>
<link href="https://schu.be/connecting-a-website-to-native-software-with-node-js.html" />
<link href="https://schu.be/connecting-a-website-to-native-software-with-node-js.html" rel="alternate" type="text/html" />
<id>https://schu.be/connecting-a-website-to-native-software-with-node-js.html</id>
<published>2020-02-04T10:00:00Z</published>
<updated>2020-02-04T10:00:00Z</updated>
<content type="html"><![CDATA[<article>

<p>I gave this talk on the 4th of February 2020 for the 38th Node.JS Berlin
meetup hosted by Contentful. There I share how at Doctolib my team manages to
connect the Doctolib website to specialized medical software, when said
software is a native program running on the user’s computer alongside the
browser, all in Javascript!</p>

<video controls width="1920" height="1080">
	<source src="assets/connecting-a-website-to-native-software-with-node-js.mp4" type="video/mp4">
	Your browser doesn’t support HTML5 videos. You can just <a
	href="assets/connecting-a-website-to-native-software-with-node-js.mp4">download
	the video</a> instead.
</video>

<p class="article-date article-date-footer"><time
   datetime="2020-02-04">February 4, 2020</time></p>
</article>]]></content>
<author>
<name>Victor Schubert</name>
<email>v@schu.be</email>
</author>
</entry>
<entry>
<title>Calling into thread-unsafe DLLs with node-ffi</title>
<link href="https://schu.be/thread-unsafe-node-ffi.html" />
<link href="https://schu.be/thread-unsafe-node-ffi.html" rel="alternate" type="text/html" />
<id>https://schu.be/thread-unsafe-node-ffi.html</id>
<published>2019-10-10T10:00:00Z</published>
<updated>2019-10-10T10:00:00Z</updated>
<content type="html"><![CDATA[<article><p>
Disclaimer: this article was originally published by yours truly <a href="https://medium.com/doctolib/calling-into-thread-unsafe-dlls-with-node-ffi-1ef83806a50c">on
Medium</a> as part of my employment at Doctolib.
</p>

<p>
Well, that’s a mouthful… Anyway let’s start with some context. I am
a French software developer working for Doctolib in our Berlin
offices with a team of developers and product owners.
</p>

<p>
We build Zipper, a standalone program that stands between the
Doctolib website in a browser and our partners’ software to bind
everything together, all thanks to <a href="https://developer.mozilla.org/en-US/docs/Mozilla/Add-ons/WebExtensions/Native_messaging">Native Messaging</a>. These bridges
help our users save time by removing the need for double entry of
patient data, in Doctolib and in their own tools, with easy
navigation between the two.
</p>

<p>
Sometimes we need to have Zipper hook into native libraries, some of
which are proprietary. For this purpose <a href="https://github.com/node-ffi/node-ffi">node-ffi</a> usually works fine,
until we need to asynchronously call into thread-unsafe
libraries. Node.JS being inherently concurrent, mixing these causes
trouble.
</p>

<h2 id="use-case">Use case</h2>
<p>
We build Zipper using Webpack, then package it with <a href="https://github.com/zeit/pkg">pkg</a> which
bundles Javascript code and the V8 engine so as to produce a
standalone executable. You can even use pkg to include assets in
your binaries for easy distribution!
</p>

<p>
Since pkg runs with Node.JS we can do everything a Node.JS program
can do, including loading and calling into DLLs (if you don’t know
what this means, hang on; I will explain it later). Recently
though, we needed to interact with some software by simulating user
input so we turned to <a href="https://www.autoitscript.com/site/">AutoIt</a>, a scripting language designed to
interact with Windows GUI elements, <em>whose functions are also
available as a DLL</em>. It turns out this library is not thread-safe
and that by using node-ffi naively we would get into trouble
(crashes, mostly) by issuing concurrent calls. But before going any
further let’s just have a refresher on what DLLs are and how they
are used, especially with Node.JS.
</p>

<h2 id="intro-to-node-ffi">Intro to node-ffi</h2>
<p>
<em>Dynamic-link libraries</em> (DLLs) contain code a running Windows
program can load and execute. Some are provided by the operating
system, some are provided by third parties and are installed either
by the programs that need it or separately by the
user. “Dynamic-link” means the libraries are loaded at runtime as
opposed to being included directly into your executable, which has
an interesting consequence: as long as the interface is the same,
you can swap library versions and still have your program work fine
with them without rebuilding it.
</p>

<p>
<a href="https://github.com/node-ffi/node-ffi">node-ffi</a> is the <em>de facto</em> standard for loading and calling into
DLLs (and their equivalent on other systems) from Node.JS. It
provides you with an object whose functions represent functions
from the library, which you can call synchronously or
asynchronously. Let’s see an example.
</p>

<p>
<code>toto.dll</code> is a library that was provided to us by a third party,
along with <code>toto.h</code>, a C header file which contains the definitions
of the functions from the library.
</p>

<pre class="src src-c"><span class="src-comment-delimiter">/* </span><span class="src-comment">toto.h</span><span class="src-comment-delimiter"> */</span>
<span class="src-type">int</span> <span class="src-function-name">toto_foo</span>(<span class="src-type">int</span>, <span class="src-type">int</span>);
<span class="src-type">void</span> <span class="src-function-name">toto_bar</span>(<span class="src-type">char</span>*);
</pre>

<p>
This simple library provides two functions:
</p>
<ul>
<li><code>toto_<wbr>foo</code> has two integer parameters and returns an integer.</li>
<li><code>toto_<wbr>bar</code> accepts a single pointer argument and returns nothing.</li>
</ul>

<p>
Using node-ffi we can load this library like this:
</p>

<pre class="src src-js"><span class="src-comment-delimiter">/* </span><span class="src-comment">toto.js</span><span class="src-comment-delimiter"> */</span>
<span class="src-keyword">import</span> { Library } from <span class="src-string">'node-ffi'</span>
<span class="src-keyword">import</span> { refType } from <span class="src-string">'ref'</span>

<span class="src-keyword">const</span> <span class="src-variable-name">charPointer</span> = ref.refType(<span class="src-string">'char'</span>)
<span class="src-keyword">export</span> <span class="src-keyword">default</span> Library(<span class="src-string">'toto.dll'</span>, {
  toto_foo: [<span class="src-string">'int'</span>, [<span class="src-string">'int'</span>, <span class="src-string">'int'</span>]],
  toto_bar: [<span class="src-string">'void'</span>, [charPointer]],
}) 
</pre>

<p>
And voilà! We now have a Javascript module which, when loaded,
loads the library, locates the functions inside and exposes them as
Javascript functions which can be called either synchronously
(which is Bad) or asynchronously. Note that using the <a href="https://github.com/TooTallNate/ref">ref</a> module
node-ffi supports using pointers, simply pass the external function
a Buffer and node-ffi will get the pointer to the Buffer’s data and
pass it to the function.
</p>

<pre class="src src-js"><span class="src-comment-delimiter">/* </span><span class="src-comment">index.js</span><span class="src-comment-delimiter"> */</span>
<span class="src-keyword">import</span> toto from <span class="src-string">'./toto'</span>

<span class="src-comment-delimiter">// </span><span class="src-comment">synchronous calls</span>
<span class="src-keyword">const</span> <span class="src-variable-name">fooResult</span> = toto.toto_foo(42, 413)
console.log(<span class="src-string">`synchronously got ${fooResult}`</span>)

<span class="src-comment-delimiter">// </span><span class="src-comment">asynchronous calls</span>
toto.toto_foo.<span class="src-keyword">async</span>(42, 413, (error, result) =&gt; {
  console.log(<span class="src-string">`asynchronously got ${result}`</span>)
})

<span class="src-comment-delimiter">// </span><span class="src-comment">using pointers</span>
<span class="src-keyword">const</span> <span class="src-variable-name">buffer</span> = Buffer.alloc(1337)
toto.toto_bar(buffer)
console.log(<span class="src-string">`synchronously used/modified ${buffer}`</span>) 
</pre>

<p>
This works fine, until you find yourself with a thread-unsafe library.
</p>

<h2 id="what-if-the-library-is-not-thread-safe">What if the library is not thread safe?</h2>
<p>
Libraries have initialization code and deinitialization code, can
allocate or deallocate memory, and have access to all the same
memory as your main process. But most importantly, they can hold
global state. Anyone who’s ever worked with concurrency most
certainly knows that concurrency and global state cause much
sadness and suffering when put together.
</p>

<p>
Oh and by the way, DLLs can contain unsafe code which can crash,
like <em>actually crash</em> as in, the operating system kills your
program. When this happens you do not get an exception or a
rejected promise. Your Javascript program stops. So when you need
to use a library which breaks when used with multiple threads, you
run into trouble.
</p>

<p>
Let’s assume <code>toto_<wbr>foo</code> is thread-unsafe. Maybe it uses some global
state or does some I/O that is not properly synchronized. The
following code will randomly crash or misbehave because Node.JS may
have multiple threads calling into the library simultaneously,
which the library does not expect.
</p>

<pre class="src src-js"><span class="src-comment-delimiter">/* </span><span class="src-comment">index-broken.js</span><span class="src-comment-delimiter"> */</span>
<span class="src-keyword">import</span> toto from <span class="src-string">'./toto'</span>

<span class="src-keyword">for</span> (<span class="src-keyword">let</span> <span class="src-variable-name">i</span> = 0; i &lt; 5; i++) {
  toto.toto_foo.<span class="src-keyword">async</span>(0, i, (error, result) =&gt; {
    console.log(result)
  })
}
</pre>

<h2 id="possible-solutions">Possible solutions</h2>
<h3 id="using-synchronous-calls">Using synchronous calls</h3>
<p>
The obvious solution in that case would be to use synchronous
calls.
</p>

<pre class="src src-js"><span class="src-keyword">import</span> toto from <span class="src-string">'./toto'</span>

<span class="src-keyword">for</span> (<span class="src-keyword">let</span> <span class="src-variable-name">i</span> = 0; i &lt; 5; i++) {
  console.log(toto.toto_foo(0, i))
} 
</pre>

<p>
Note that this blocks a Javascript thread, which means that while
the function is running, no other Javascript code can execute. The
event loop itself is blocked. This might be fine, as long as you
know that function will not block for long. However you can’t do
this if your function does I/O, heavy computations, sleeps,
etc. Also remember there is an overhead to calling functions over
FFI.
</p>

<p>
Sadly for our purposes this could not work as we use many AutoIt
functions which wait for specific events to happen, and would
block our process from performing any of the other tasks it
<em>needs</em> to perform at any time.
</p>

<h3 id="serializing-asynchronous-calls">Serializing asynchronous calls</h3>
<p>
Asynchronicity does not prevent us from serializing all the calls
to the library only with Javascript. We can fairly simply write a
wrapper to the library which hides the synchronous functions and
wraps the asynchronous functions to have their calls wait in a
queue while a call is in progress.
</p>

<pre class="src src-js"><span class="src-keyword">import</span> toto from <span class="src-string">'./toto'</span>
<span class="src-keyword">import</span> { promisify } from <span class="src-string">'util'</span>

<span class="src-keyword">let</span> <span class="src-variable-name">queue</span> = Promise.resolve()

<span class="src-keyword">async</span> <span class="src-keyword">function</span> enqueueCall(<span class="src-variable-name">call</span>, <span class="src-variable-name">callback</span>) {
  <span class="src-keyword">await</span> queue
  <span class="src-keyword">try</span> {
    <span class="src-keyword">const</span> <span class="src-variable-name">result</span> = <span class="src-keyword">await</span> call()
    <span class="src-keyword">try</span> { callback(<span class="src-constant">null</span>, result) } <span class="src-keyword">catch</span> {}
  } <span class="src-keyword">catch</span>(error) {
    <span class="src-keyword">try</span> { callback(error, <span class="src-constant">null</span>) } <span class="src-keyword">catch</span> {}
  }
}

<span class="src-keyword">function</span> <span class="src-function-name">wrapAsyncCall</span>(<span class="src-variable-name">functionName</span>) {
  <span class="src-keyword">const</span> <span class="src-variable-name">wrappedFunction</span> = promisify(toto[functionName])
  <span class="src-keyword">return</span> (...args) =&gt; {
    <span class="src-keyword">const</span> <span class="src-variable-name">callback</span> = args.pop()
    queue = queue.then(
      <span class="src-keyword">async</span> () =&gt; {
        <span class="src-keyword">const</span> <span class="src-variable-name">result</span> = <span class="src-keyword">await</span> wrappedFunction(...args)
        <span class="src-keyword">try</span> { callback(<span class="src-constant">null</span>, result) } <span class="src-keyword">catch</span> {}
      },
      error =&gt; {
        <span class="src-keyword">try</span> { callback(error, <span class="src-constant">null</span>) } <span class="src-keyword">catch</span> {}
      }
    )
  }
}

<span class="src-keyword">const</span> <span class="src-variable-name">wrappedFunctions</span> = {}
<span class="src-keyword">for</span> (<span class="src-keyword">const</span> <span class="src-variable-name">functionName</span> <span class="src-keyword">in</span> toto) {
  wrappedFunctions[functionName] = wrapAsyncCall(functionName)
}

<span class="src-keyword">export</span> <span class="src-keyword">default</span> wrappedFunctions 
</pre>

<h3 id="fixing-the-library">Fixing the library</h3>
<p>
In the case of a free and open-source library, or a library you
built yourself, you can of course fix the library to make it
thread-safe. There is no way I can cover this subject in a single
blog post, or even many. For each library adding support for
multi-threading will be a different problem which requires solid
knowledge of concurrent programming and of the internals of the
library being modified, plus lots of time, especially for larger
libraries.
</p>

<h3 id="wrapping-the-library">Wrapping the library</h3>
<p>
This is the solution we eventually went for. We actually had cases
where we needed to wait on some event using AutoIt, while
simultaneously issuing other calls that would lead this event to
happen. However, the DLL’s implementation of the waiting function
was blocking. Node-ffi lets us run this blocking function
asynchronously by running it in a separate thread.
</p>

<p>
However, if we serialize the calls, this will inevitably lead to a
deadlock: if we simultaneously run
</p>
<ul>
<li>a call that waits for an event</li>
<li>a call that contributes to producing said event</li>
</ul>
<p>
and we serialize the calls, the second call will never happen and
the first one will never return (unless it times out, which isn’t
what we want either).
</p>

<p>
Because we do not have access to the sources of the AutoIt library
we could not try and make it multithreaded, so we decided we would
write a wrapper around the library which exposes an identical
interface (making our wrapper a drop-in replacement for the real
library). I will only give a high-level overview of this solution
because it is quite a bit more complex than the previous ones I
presented. If you are curious you can get the code to our wrapper
<a href="https://github.com/doctolib/safe-autoit">on Github</a>.
</p>

<p>
We were thinking: this library is a high-level wrapper for Windows
system calls which are thread-safe, so the issue had to be in the
library implementation, likely in the form of global state or the
like. So we thought a possible solution would be to load the
library multiple times, each time instantiating a duplicate of its
internal state. And so as a proof-of-concept we built a wrapper
with no internal state which for every call to the library
would
</p>
<ol>
<li>Load the library (with <a href="https://docs.microsoft.com/en-gb/windows/win32/api/libloaderapi/nf-libloaderapi-loadlibrarya"><code>LoadLibrary</code></a>).</li>
<li>Get the function we’re calling.</li>
<li>Call it.</li>
<li>Unload the library (with <a href="https://docs.microsoft.com/en-gb/windows/win32/api/libloaderapi/nf-libloaderapi-freelibrary"><code>FreeLibrary</code></a>).</li>
</ol>

<p>
<em>This did not work.</em> It turns out calling LoadLibrary multiple
times to load the same library always returns the same
instance. The more flexible <code>LoadLiraryEx</code> does not have an option
to override this either so we decided to trick Windows into
believing we were loading a different library. Thus our second
proof-of-concept attempt was still a stateless wrapper which would
do this at each call.
</p>

<ol>
<li>Find the library.</li>
<li>Copy it to a temporary file.</li>
<li>Load the temporary file as a library.</li>
<li>Get the function we want to call.</li>
<li>Call it.</li>
<li>Unload the library.</li>
<li>Delete the temporary file.</li>
</ol>

<p>
It roughly looks like this:
</p>

<pre class="src src-c"><span class="src-preprocessor">#include</span> <span class="src-string">&lt;windows.h&gt;</span>

<span class="src-keyword">const</span> <span class="src-type">LPWSTR</span> <span class="src-variable-name">dll_path</span> = <span class="src-string">"./toto.dll"</span>

<span class="src-type">int</span> __stdcall toto_foo(<span class="src-type">int</span> <span class="src-variable-name">a</span>, <span class="src-type">int</span> <span class="src-variable-name">b</span>)
{
  WCHAR tmp_path[MAX_PATH + 1] = {0};
  GetTempFileNameW(L<span class="src-string">"."</span>, L<span class="src-string">"toto.tmp"</span>, 0, tmp_path);
  CopyFileW(dll_path, tmp_path, <span class="src-constant">false</span>);
  <span class="src-keyword">const</span> <span class="src-type">HANDLE</span> <span class="src-variable-name">dll_handle</span> = LoadLibraryW(tmp_path);
  <span class="src-type">int</span> <span class="src-function-name">_stdcall</span> (*fun)(<span class="src-type">int</span>, <span class="src-type">int</span>) =
    GetProcAddress(dll_handle, <span class="src-string">"toto_foo"</span>);
  <span class="src-type">int</span> <span class="src-variable-name">result</span> = (*fun)(a, b);
  FreeLibrary(dll_handle);
  DeleteFileW(tmp_path);
  <span class="src-keyword">return</span> result;
} 
</pre>

<p>
Of course this is getting ridiculously inefficient because it
copies, loads, and deletes a file for each and every call to the
library but it works! We could do many simultaneous calls and
nothing broke (almost, more on that later). We later improved the
performance by keeping instances of the library in a pool so that
we don’t need to copy and load it for every call.
</p>

<p>
One thing that broke with this approach is that this library does
indeed have internal state; it has functions which change the
behaviour of other functions by changing said state. However, our
wrapper does not yet have a feature allowing us to dispatch a
sequence of function calls to the same library instance. This is
something we will fix by adding some API to our wrapper that lets
the Javascript program “reserve” an instance and call multiple
functions on it with the guarantee that all these calls will be
dispatched to the same instance.
</p>

<h2 id="conclusion">Conclusion</h2>
<p>
While this strategy worked fine for our purposes, it is only a
first working solution. It has allowed us to use AutoIt to interact
with multiple GUI elements simultaneously, speeding up these
interactions significantly! (One particular form used to take about
a second and a half to fill, and is now complete in about 100
milliseconds.) There is much room for improvement: we could for
example build a generic tool that would apply this technique to
arbitrary libraries.
</p>

<p>
This was an interesting problem for us to solve as it shows that
diving into the lower-level workings of Javascript and programs in
general you can solve hard problems in creative ways.
</p>
<p class="article-date article-date-footer"><time datetime="2019-10-10">October 10, 2019</time></p>
</article>]]></content>
<author>
<name>Victor Schubert</name>
<email>v@schu.be</email>
</author>
</entry>
<entry>
<title>Remplacer la Freebox fibre par un routeur Mikrotik</title>
<link href="https://schu.be/replace-freebox-with-mikrotik.html" />
<link href="https://schu.be/replace-freebox-with-mikrotik.html" rel="alternate" type="text/html" />
<id>https://schu.be/replace-freebox-with-mikrotik.html</id>
<published>2018-03-18T10:00:00Z</published>
<updated>2018-03-18T10:00:00Z</updated>
<content type="html"><![CDATA[<article>

<h2>Introduction</h2>
<p>J’aime avoir le contrôle de mon matériel informatique. C’est pourquoi j’ai décidé de remplacer ma Freebox fibre par un routeur Mikrotik RB2011UiAS<wbr>-2HnD. Comme je ne regarde pas la télévision ni n’utilise de téléphone fixe, les fonctionnalités dont j’ai besoin sont assez limitées :</p>
<ul>
	<li>Connectivité IPv4 avec addresse publique fixe.</li>
	<li>Connectivité IPv6 avec préfixe et addresses globales.</li>
</ul>
<p>J’ai pu atteindre ces deux objectifs et cet article est un résumé de mon parcours et des configurations que j’ai effectué. Je suis certain qu’il est possible d’avoir accès à la télévision et au téléphone VoIP à partir de cette installation. Si je le fais un jour, j’écrirai un autre article.</p>
<h2>Installation du matériel
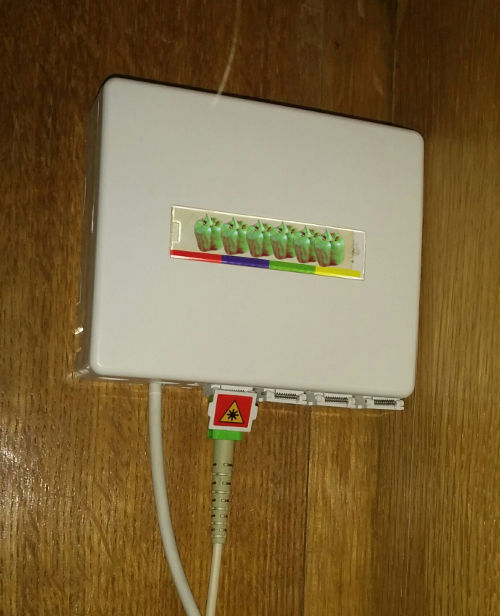
</h2>
<p>Je dispose de la fibre <abbr title="« Fiber To The Home », en français « fibre à domicile »">FTTH</abbr>, c’est à dire que je dispose dans mon salon du boîtier permettant de connecter ma box à la fibre du bâtiment. Lorsque les techniciens Free sont venus faire leurs installations, ils ont connecté une fibre au boîtier ( fibre avec une gaine verte sur l’image ). L’autre extrémité de cette fibre fut équipée d’un module SPF permettant de faire le lien entre les composantes électroniques de la Freebox et les signaux lumineux de la fibre. Ce module SPF peut être extrait de la Freebox s’il y est déjà branché.</p>
<figure>
	<img src="assets/ftth.jpg" alt="Boîtier FTTH, deux fibres y sont connectées." style="max-width: 500px; max-height: 616px;">
	<figcaption>Boîtier FTTH. Y sont connectés une fibre allant vers le reste du bâtiment, et une allant vers mon routeur.</figcaption>
</figure>
<figure>
	<img src="assets/spf.jpg" alt="Routeur Mikrotik avec fibre connectée via un module SPF." style="max-width: 500px; max-height: 452px;">
	<figcaption>Routeur Mikrotik. La fibre ( avec une gaîne bleue et noire ) est connectée au module SPF, lui-même inséré dans le routeur.</figcaption>
</figure>
<p>
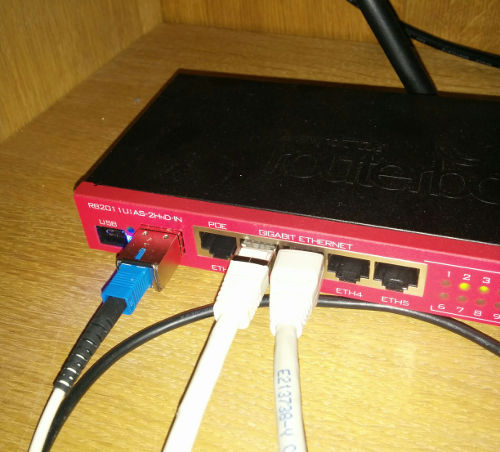
Si tout est connecté alors nous sommes prêts à configurer le routeur.</p>

<h2>Connectivité IPv4</h2>
<p>Pour commencer, j’ai tenté d’établir la connectivité IPv4. Simplement brancher le routeur à la fibre ne suffit pas. Je n’ai pas vraiment trouvé de documentation satisfaisante sur Internet concernant la configuration requise, donc j’ai décidé de fournir un peu de travail d’investigation.</p>
<h3>Inspection du traffic sur la fibre</h3>
<p>RouterOS est équipé d’un sniffeur de paquets, qui permet de filtrer et d’inspecter tous les paquets traités par le routeur. Ce système reste toutefois limité en termes de visualisation, c’est pourquoi j’utiliserai Wireshark pour inspecter tout ce qui passe sur la fibre. Heureusement, nous pouvons utiliser le routeur pour faire suivre les paquets qu’il inspecte à une instance de Wireshark sur un PC en réseau.</p>
<p>Voici la configuration que j’ai utilisé pour intercepter les paquets sur le Mikrotik :</p>
<code class="block">
	<span class="ros-cmd-path">/tool sniffer</span> <span class="ros-cmd">set</span> \<br />
	&nbsp;&nbsp;&nbsp;&nbsp;<span class="ros-param">only-headers</span><span class="ros-op">=</span><span class="ros-arg">no</span> \<br />
	&nbsp;&nbsp;&nbsp;&nbsp;<span class="ros-param">streaming-enabled</span><span class="ros-op">=</span><span class="ros-arg">yes</span> \<br />
	&nbsp;&nbsp;&nbsp;&nbsp;<span class="ros-param">streaming-server</span><span class="ros-op">=</span><span class="ros-arg">&lt;IP de la machine exécutant Wireshark&gt;</span> \<br />
	&nbsp;&nbsp;&nbsp;&nbsp;<span class="ros-param">filter-interface</span><span class="ros-op">=</span><span class="ros-arg">sfp1</span> \<br />
	&nbsp;&nbsp;&nbsp;&nbsp;<span class="ros-param">filter-direction</span><span class="ros-op">=</span><span class="ros-arg">any</span> \<br />
	&nbsp;&nbsp;&nbsp;&nbsp;<span class="ros-param">filter-operator-between-entries</span><span class="ros-op">=</span><span class="ros-arg">and</span><br />
	<br />
	<span class="ros-cmd-path">/tool sniffer</span> <span class="ros-cmd">start</span>
	<sub class="lang">RouterOS</sub>
</code>
<p>À partir de maintenant, le routeur relaie une copie de chaque paquet passant sur la fibre à la machine dont j’ai spécifié l’addresse IP. Il suffit désormais d’y lancer Wireshark, de sélectionner l’interface adéquate et d’écrire dans la barre de filtrage, <code>tzsp</code>, afin de ne voir que ces paquets.</p>
<p>Je vois alors passer du traffic, surtout des requêtes ARP qui viennent donc du routeur auquel je suis directement connecté. Je remarque cependant que tous ces paquets sont sur le VLAN 836. Je vais donc tenter de me mettre sur ce VLAN et d’y faire une requête DHCP.</p>
<p>N’oublions pas d’arrêter le sniffeur lorsque nous n’en avons plus besoin.</p>
<code class="block">
	<span class="ros-cmd-path">/tool sniffer</span> <span class="ros-cmd">stop</span>
	<sub class="lang">RouterOS</sub>
</code>
<h3>Connexion au VLAN 836 et requêtes DHCP</h3>
<p>Pour utiliser un VLAN sur RouterOS, on crée une « interface virtuelle » représentant un VLAN sur une interface. Pour créer cette interface virtuelle, j’utilise la commande suivante.</p>
<code class="block">
	<span class="ros-cmd-path">/interface vlan</span> <span class="ros-cmd">add</span> <span class="ros-param">name</span><span class="ros-op">=</span><span class="ros-arg">sfp1:836</span> <span class="ros-param">vlan-id</span><span class="ros-op">=</span><span class="ros-arg">836</span> <span class="ros-param">interface</span><span class="ros-op">=</span><span class="ros-arg">sfp1</span>
	<sub class="lang">RouterOS</sub>
</code>
<p>Je peux désormais utiliser <code>sfp1:836</code> tel n’importe quelle autre interface afin de communiquer sur le VLAN 836. Je vais le faire immédiatement en tentant d’obtenir une IP grâce à DHCP.</p>
<code class="block">
	<span class="ros-cmd-path">/ip dhcp-client</span> <span class="ros-cmd">add</span> \<br />
	&nbsp;&nbsp;&nbsp;&nbsp;<span class="ros-param">interface</span><span class="ros-op">=</span><span class="ros-arg">sfp1:836</span> \<br />
	&nbsp;&nbsp;&nbsp;&nbsp;<span class="ros-param">add-default-route</span><span class="ros-op">=</span><span class="ros-arg">yes</span><br />
	<sub class="lang">RouterOS</sub>
</code>
<p><strong>MAGIE !</strong> Un serveur DHCP a répondu aux requêtes de mon routeur et ce dernier s’est vu assigner une addresse IPv4. Quelques tests rapides indiquent que cette addresse me permet en effet de contacter le reste d’Internet ! Je ne détaillerai pas ici la mise en place d’un réseau local filaire et sans-fil, d’un serveur DHCP et de NAT permettant à des machines d’opérer sur un réseau privé IPv4, il existe déjà de nombreuses ressources à cet effet accessibles à l’aide d’un moteur de recherche.</p>
<blockquote class="note"><p>Je n’ai pas trouvé de documentation indiquant que cette IP est fixe et je ne sais pas si c’est influencé par l’option accessible sur la Freebox. Je n’ai jamais connecté ma Freebox et cette addresse est restée fixe depuis que j’ai fait ces installations. Je pense donc que c’est effectivement une IP fixe par défaut.</p></blockquote>

<h2>Connectivité IPv6</h2>
<p>Actuellement, Free ne supporte pas nativement l’IPv6. Afin de fournir ce service, ils utilisent des tunnels 6to4 encapsulant le traffic IPv6 dans des paquets IPv4 et l’acheminant jusqu’à des gateways connectées au réseau IPv6. Afin de pouvoir déterminer la destination du traffic IPv6 entrant, le préfixe IPv6 de chaque client Free est généré à partir de leur IPv4 en suivant un procédé simple.</p>
<h3>Convertir une IPv4 Free en un préfixe IPv6</h3>
<p>Insérez l’IPv4 globale que Free vous a assigné dans le champ de texte qui suit pour obtenir votre préfixe IPv6. Celui-ci est obtenu en insérant votre IPv4 dans le préfixe 2a01:e3X:XXXX:XXX0::/64, en remplaçant les X par l’IPv4 hexadécimale. ( La conversion se fait en local. À aucun moment l’IP que vous écrivez ici ne quitte votre navigateur. )</p>
<blockquote>
	<label for="ipv4">IPv4 :</label> <input id="ipv4" type="text" value="82.83.84.85"><br />
	IPv6 : 2a01:e3<span id="ipv4-in-ipv6">5:2535:4550</span>::/64
</blockquote>
<script> // I’m so sorry…
	var ip4Input = document.getElementById('ipv4');
	var ip6Output = document.getElementById('ipv4-in-ipv6');
	var ip4Regex = /^0*(?:2(?:5[0-5]|[0-4][0-9])|1?[0-9]{1,2})\.0*(?:2(?:5[0-5]|[0-4][0-9])|1?[0-9]{1,2})\.0*(?:2(?:5[0-5]|[0-4][0-9])|1?[0-9]{1,2})\.0*(?:2(?:5[0-5]|[0-4][0-9])|1?[0-9]{1,2})$/;
	var hex = '0123456789abcdef';
	ip4Input.addEventListener('input', function(event) {
		var ip4Address = event.target.value;
		if (ip4Regex.test(ip4Address)) {
			var ip4Bytes = ip4Address.split('.').map(function(b) { return +b });
			var ip4Digits = new Array(8);
			for (var i = 0; i < 8; i++) {
				ip4Digits[i] = ip4Bytes[i>>1] >> (4 * (~i & 1)) & 0x0F;
			}
			var ip6FragmentA = hex[ip4Digits[0]];
			var ip6FragmentB = (
				(ip4Digits[1] ? hex[ip4Digits[1]] : '') +
				(ip4Digits[1] || ip4Digits[2] ? hex[ip4Digits[2]] : '') +
				(ip4Digits[1] || ip4Digits[2] || ip4Digits[3] ? hex[ip4Digits[3]] : '') +
				(ip4Digits[1] || ip4Digits[2] || ip4Digits[3] || ip4Digits[4] ? hex[ip4Digits[4]] : '')
			);
			var ip6FragmentC = (
				(ip4Digits[5] ? hex[ip4Digits[5]] : '') +
				(ip4Digits[5] || ip4Digits[6] ? hex[ip4Digits[6]] : '') +
				(ip4Digits[5] || ip4Digits[6] || ip4Digits[7] ? hex[ip4Digits[7]] + '0' : '')
			);
			var ip6Fragment = null;
			if (ip6FragmentB === '' && ip6FragmentC === '') {
				ip6Fragment = ip6FragmentA;
			} else if (ip6FragmentC === '') {
				ip6Fragment = ip6FragmentA + ':' + ip6FragmentB;
			} else {
				ip6Fragment = ip6FragmentA + ':' + (ip6FragmentB || '0') + ':' + ip6FragmentC;
			}
			ip4Input.classList.remove('invalid');
			ip6Output.textContent = ip6Fragment;
		} else {
			ip4Input.classList.add('invalid');
			ip6Output.textContent = 'X:XXXX:XXX0';
		}
	});
</script>

<h3>Mise en place du tunnel 6to4</h3>
<p>Si depuis une machine supportant l’IPv6 je ping une addresse dans mon préfixe, si j’analyse les paquets qui arrivent sur le routeur, je vois d’ores et déjà arriver le 6to4 sur le VLAN 836. Mon routeur, n’étant pas encore configuré pour les utiliser, les ignore. En inspectant leur source, je détermine l’addresse de la gateway 6to4.</p>
<p>Comme pour le VLAN, le 6to4 est configuré en créant une interface virtuelle. Ceci se fait à l’aide de la commande suivante.</p>
<code class="block">
	<span class="ros-cmd-path">/interface 6to4</span> <span class="ros-cmd">add</span> \<br />
	&nbsp;&nbsp;&nbsp;&nbsp;<span class="ros-param">name</span><span class="ros-op">=</span><span class="ros-arg">ip6-tunnel</span> \<br />
	&nbsp;&nbsp;&nbsp;&nbsp;<span class="ros-param">remote-address</span><span class="ros-op">=</span><span class="ros-arg">&lt;IP de la gateway 6to4&gt;</span> \<br />
	&nbsp;&nbsp;&nbsp;&nbsp;<span class="ros-param">local-address</span><span class="ros-op">=</span><span class="ros-arg">&lt;Mon IPv4 publique&gt;</span><br />
	<sub class="lang">RouterOS</sub>
</code>
<p>Le routeur est désormais capable de recevoir et d’envoyer des paquets IPv6. Il ne reste plus qu’à lui donner une addresse IPv6 dans son préfixe et à configurer le routage.</p>

<h3>Routage IPv6</h3>
<p>D’abord, donnons au routeur une addresse qu’il pourra annoncer sur le réseau local. Connaissant notre préfixe, j’utilise la commande suivante.</p>
<code class="block">
	<span class="ros-cmd-path">/ipv6 address</span> <span class="ros-cmd">add</span> \<br />
	&nbsp;&nbsp;&nbsp;&nbsp;<span class="ros-param">address</span><span class="ros-op">=</span><span class="ros-arg">2a01:e3X:XXXX:XXX0::1/64</span> \<br />
	&nbsp;&nbsp;&nbsp;&nbsp;<span class="ros-param">interface</span><span class="ros-op">=</span><span class="ros-arg">&lt;Interface du réseau local&gt;</span> \<br />
	&nbsp;&nbsp;&nbsp;&nbsp;<span class="ros-param">advertise</span><span class="ros-op">=</span><span class="ros-arg">yes</span><br />
	<sub class="lang">RouterOS</sub>
</code>
<p>Comme nous avons activé l’annonce de l’addresse, toutes les machines sur le réseau local s’auto-assigneront une addresse sur le préfixe ! Ne reste plus que le routage vers Internet.</p>
<code class="block">
	<span class="ros-cmd-path">/ipv6 route</span> <span class="ros-cmd">add</span> \<br />
	&nbsp;&nbsp;&nbsp;&nbsp;<span class="ros-param">dst-address</span><span class="ros-op">=</span><span class="ros-arg">2000::/3</span> \<br />
	&nbsp;&nbsp;&nbsp;&nbsp;<span class="ros-param">gateway</span><span class="ros-op">=</span><span class="ros-arg">ip6-tunnel</span>
	<sub class="lang">RouterOS</sub>
</code>
<p>Et voila ! Le réseau est désormais connecté à la fois en IPv4 et en IPv6, et toutes nos IPv6 sont joignables de l’extérieur, sans avoir besoin de DHCPv6 ou autre non-sens. Avec juste cette configuration, aucune de nos machines connectées en IPv6 ne bénéficient de protection de la part du routeur. Je choisis personellement de bloquer le traffic IPv6 entrant par défaut, en ouvrant au besoin lorsque je décide qu’une machine devrait être joignable. Je donne ci-après la base de mes règles de pare-feu. Adaptez-les à vos besoins !</p>
<code class="block">
	<span class="ros-cmd-path">/ipv6 firewall filter</span> <span class="ros-cmd">add</span> <span class="ros-param">chain</span><span class="ros-op">=</span><span class="ros-arg">forward</span> <span class="ros-param">action</span><span class="ros-op">=</span><span class="ros-arg">accept</span> <span class="ros-param">protocol</span><span class="ros-op">=</span><span class="ros-arg">icmpv6</span><br />
	<span class="ros-cmd-path">/ipv6 firewall filter</span> <span class="ros-cmd">add</span> <span class="ros-param">chain</span><span class="ros-op">=</span><span class="ros-arg">forward</span> <span class="ros-param">action</span><span class="ros-op">=</span><span class="ros-arg">accept</span> <span class="ros-param">in-interface</span><span class="ros-op">=</span><span class="ros-arg">in</span> <span class="ros-param">out-interface-list</span><span class="ros-op">=</span><span class="ros-arg">out</span><br />
	<span class="ros-cmd-path">/ipv6 firewall filter</span> <span class="ros-cmd">add</span> <span class="ros-param">chain</span><span class="ros-op">=</span><span class="ros-arg">forward</span> <span class="ros-param">action</span><span class="ros-op">=</span><span class="ros-arg">accept</span> <span class="ros-param">connection-state</span><span class="ros-op">=</span><span class="ros-arg">established,related</span> <span class="ros-param">out-interface</span><span class="ros-op">=</span><span class="ros-arg">in</span> <span class="ros-param">in-interface-list</span><span class="ros-op">=</span><span class="ros-arg">out</span><br />
	<span class="ros-cmd-path">/ipv6 firewall filter</span> <span class="ros-cmd">add</span> <span class="ros-param">chain</span><span class="ros-op">=</span><span class="ros-arg">forward</span> <span class="ros-param">action</span><span class="ros-op">=</span><span class="ros-arg">reject</span> <span class="ros-param">reject-with</span><span class="ros-op">=</span><span class="ros-arg">icmp-no-route</span><br />
	<span class="ros-cmd-path">/ipv6 firewall filter</span> <span class="ros-cmd">add</span> <span class="ros-param">chain</span><span class="ros-op">=</span><span class="ros-arg">input</span> <span class="ros-param">action</span><span class="ros-op">=</span><span class="ros-arg">accept</span> <span class="ros-param">protocol</span><span class="ros-op">=</span><span class="ros-arg">icmpv6</span><br />
	<span class="ros-cmd-path">/ipv6 firewall filter</span> <span class="ros-cmd">add</span> <span class="ros-param">chain</span><span class="ros-op">=</span><span class="ros-arg">input</span> <span class="ros-param">protocol</span><span class="ros-op">=</span><span class="ros-arg">tcp</span> <span class="ros-param">in-interface</span><span class="ros-op">=</span><span class="ros-arg">in</span> <span class="ros-param">dst-port</span><span class="ros-op">=</span><span class="ros-arg">22</span><br />
	<span class="ros-cmd-path">/ipv6 firewall filter</span> <span class="ros-cmd">add</span> <span class="ros-param">chain</span><span class="ros-op">=</span><span class="ros-arg">input</span> <span class="ros-param">action</span><span class="ros-op">=</span><span class="ros-arg">reject</span> <span class="ros-param">reject-with</span><span class="ros-op">=</span><span class="ros-arg">icmp-no-route</span><br />
	<sub class="lang">RouterOS</sub>
</code>
<p class="article-date article-date-footer"><time datetime="2018-03-18">18 mars 2018</time></p>
</article>]]></content>
<author>
<name>Victor Schubert</name>
<email>v@schu.be</email>
</author>
</entry>
<entry>
<title>Don’t use Javascript numbers for your IDs</title>
<link href="https://schu.be/js-number-ids.html" />
<link href="https://schu.be/js-number-ids.html" rel="alternate" type="text/html" />
<id>https://schu.be/js-number-ids.html</id>
<published>2024-08-02T10:00:00Z</published>
<updated>2024-08-02T10:00:00Z</updated>
<content type="html"><![CDATA[<article>
<p>
Under the hood, Javascript numbers are double floats, even in cases where
conceptually we are dealing with integers. And in the vast majority of cases
this is perfectly fine. Actually we can define “the vast majority of
cases”. This is: as long as our integers fall in the inclusive range from
<code>Number.<wbr>MIN_<wbr>SAFE_<wbr>INT</code> and <code>Number.<wbr>MAX_<wbr>SAFE_<wbr>INT</code>, which are equal to −(2<sup>53</sup>−1)
and 2<sup>53</sup>−1, respectively. (Important, yet easy to miss: the exponent is 53,
not the 63 you usually see when measuring the bounds of 64-bit integers.) But
what happens when we start dealing with integers larger than that? Things get
quite silly indeed.
</p>

<pre class="src src-plain">&gt; Number.parseInt("10000000000000001")
10000000000000000
&gt; Number.parseInt("9999999999999999")
10000000000000000
&gt; 10000000000000000 + 1
10000000000000000
&gt; 10000000000000000 + 1 === 10000000000000000
true
</pre>

<p>
What is happening here is that at this magnitude, beyond the safe integer range,
floating point numbers are not precise enough to represent each integer. In
other words, the gap between one float and the next becomes large enough to skip
over some integers. Then we are forced to round up or down to the nearest
representable integer.
</p>

<p>
This is not an issue if we are representing a quantity. After all, these are
just rounding errors we are talking about, and when we get to the quadrillons
and quintillions being off by one simply will not matter in most cases. But
numerical IDs, the ones we use to identify rows in a SQL table for example, are
a different kind of numbers. They are not quantities, and it is essential that
they always be exact values. Otherwise, what is a rounding error when measuring
a quantity, morphs into pulling data for the wrong customer.
</p>

<p>
Now, this is rarely a problem in practice because your auto-incrementing IDs
won’t reach those magnitudes any time soon. If you trust that your IDs will
always work the same, ever counting away from one, then you’ll be fine. 2<sup>53</sup>
is so mind-boggingly large already that no matter how big your project becomes,
I can confidently affirm that no counter in there will ever reach this
number. But I invite you to consider, that systems and the practices that
surround them evolve, and that your IDs and how they are generated can change in
such ways that you can reach this dangerous point where you can no longer trust
your IDs. I have seen two real-life situations which could have triggered this.
</p>

<p>
The first, was a coworker designing a new SQL table. I unfortunately cannot
recall the specifics. The table in question was going to have an int64
ID. Pretty typical so far. But this ID was not going to be your usual
auto-incrementing ID. Instead, it was to be randomly chosen in the [1, 2<sup>63</sup>)
range for each new record. This would have meant that 99.9% of all generated IDs
would have fallen outside of the safe integer range. The design later was
changed to use a UUIDv4 instead.
</p>

<p>
The second didn’t get as close, but highlights a general way that this can
happen. The company was growing, and one table in particular that had an int32
ID was reaching into the two billion records, nearing the int32 limit. We
migrated the ID to int64 in time, but unfortunately another table that had an
int32 foreign key to the bigger table was forgotten. Eventually 2<sup>31</sup>−1 was
reached and the foreign keys broke. I found the fix to be clever: the
auto-increment counter of the big table was reset to −2<sup>31</sup>, exploiting the
usually ignored negative range of int32 IDs to give us time to migrate the
forgotten table before setting it back to a high positive value. Now if we had
been using int64 from the start we wouldn’t have been in this situation and so I
cannot claim that we would have reset the counter to −2<sup>63</sup> and fallen outside
the safe integer range. And yet, this highlights that the number an
auto-incrementing counter is counting from, can be changed to extreme values,
including those that Javascript numbers won’t be able to handle.
</p>

<p>
And so I claim: even for the most basic auto-incrementing integer IDs, the
appropriate type to use in Javascript is the string, rather than the
number. You won’t be able to do math on your IDs, but that’s not normally
something you do. This also has the potential to make a migration easier if in
the future you choose to replace those numerical IDs with UUIDs or some other ID
not normally represented by integers. <a href="https://developer.mozilla.org/en-US/docs/Web/JavaScript/Reference/Global_Objects/BigInt">BigInts</a> would also be a practical solution
if it was possible to have <code>JSON.<wbr>parse</code> produce them, but in my opinion this
makes things more complicated, marginally more efficient and the added ability
to do math on IDs is just not useful.
</p>
<p class="article-date article-date-footer"><time datetime="2024-08-02">August 2, 2024</time></p>
</article>]]></content>
<author>
<name>Victor Schubert</name>
<email>v@schu.be</email>
</author>
</entry>
<entry>
<title>Regular expressions library</title>
<link href="https://schu.be/regexps.html" />
<link href="https://schu.be/regexps.html" rel="alternate" type="text/html" />
<id>https://schu.be/regexps.html</id>
<published>2017-11-14T10:00:00Z</published>
<updated>2017-11-29T10:00:00Z</updated>
<content type="html"><![CDATA[<article>
<p>Here I compile some of the regular expressions I made and think might be useful later on. I will update this page sometimes if I come up with others.</p>
<h2>IPv4</h2>
<p>This regular expression will match valid IPv4 addresses: it checks that bytes are in the [0-255] range and allows leading zeroes.</p>
<code class="block block-wrap">
0*(?:2(?:5[0-5]|[0-4][0-9])|1?[0-9]{1,2})\.0*(?:2(?:5[0-5]|[0-4][0-9])|1?[0-9]{1,2})\.0*(?:2(?:5[0-5]|[0-4][0-9])|1?[0-9]{1,2})\.0*(?:2(?:5[0-5]|[0-4][0-9])|1?[0-9]{1,2})
</code>
<h2>IPv6</h2>
<p>This expression will match valid IPv6 addresses, with support for empty group substitution and groups with fewer than four characters.</p>
<code class="block block-wrap">
(?:2(?:5[0-5]|[0-4][0-9])|[01]?[0-9]{1,2})(?:\.(?:2(?:5[0-5]|[0-4][0-9])|[01]?[0-9]{1,2})){3}|[0-9A-Fa-f]{1,4}(?::[0-9A-Fa-f]{1,4}){7}|:(?:(?::[0-9A-Fa-f]{1,4}){1,7}|:)|[0-9A-Fa-f]{1,4}:(?:(?::[0-9A-Fa-f]{1,4}){1,6}|:)|[0-9A-Fa-f]{1,4}:[0-9A-Fa-f]{1,4}:(?:(?::[0-9A-Fa-f]{1,4}){1,5}|:)|[0-9A-Fa-f]{1,4}(?::[0-9A-Fa-f]{1,4}){2}:(?:(?::[0-9A-Fa-f]{1,4}){1,4}|:)|[0-9A-Fa-f]{1,4}(?::[0-9A-Fa-f]{1,4}){3}:(?:(?::[0-9A-Fa-f]{1,4}){1,3}|:)|[0-9A-Fa-f]{1,4}(?::[0-9A-Fa-f]{1,4}){4}:(?:(?::[0-9A-Fa-f]{1,4}){1,2}|:)|[0-9A-Fa-f]{1,4}(?::[0-9A-Fa-f]{1,4}){5}:(?::[0-9A-Fa-f]{1,4}|:)
</code>
<h2>S3 Object URI</h2>
<p>This expression will match an AWS S3 object URI. The <code>s3://</code> part is optional. The capturing groups will match, in order, the bucket name without <code>s3://</code> or trailing slash, and the key without leading slash.</p>
<code class="block block-wrap">
^(?:s3:\/\/)?((?![^\/]{1,61}\.\.[^\/]{1,61})[a-z.-]{3,63})(?:\/(.{0,1024}))?$
</code>
<p>This variant makes the leading <code>s3://</code> mandatory.</p>
<code class="block block-wrap">
^s3:\/\/((?![^\/]{1,61}\.\.[^\/]{1,61})[a-z.-]{3,63})(?:\/(.{0,1024}))?$
</code>
<p class="article-date article-date-footer"><time datetime="2017-11-14">November 14, 2017</time> (updated <time datetime="2017-11-29">November 29, 2017</time>)</p>
</article>]]></content>
<author>
<name>Victor Schubert</name>
<email>v@schu.be</email>
</author>
</entry>
<entry>
<title>Publishing a website with IPFS</title>
<link href="https://schu.be/ipfs-website.html" />
<link href="https://schu.be/ipfs-website.html" rel="alternate" type="text/html" />
<id>https://schu.be/ipfs-website.html</id>
<published>2017-06-22T10:00:00Z</published>
<updated>2017-06-22T10:00:00Z</updated>
<content type="html"><![CDATA[<article>
<h2>What is IPFS?</h2>
<p><a href="https://ipfs.io/">The Inter-Planetary File System</a> is a solution for a permanent, robust, decentralized and uncensorable web. As of this writing it is under active development; and their team recently <a href="https://ipfs.io/blog/24-uncensorable-wikipedia/">made snapshots of the Turkish, Kurdish and Arabic versions of Wikipedia</a> to combat the Turkish government&rsquo;s censorship of Wikipedia.</p>
<p>There are yet many features on the roadmap for IPFS, including native encryption of content, support for network topologies such as Tor, or messaging. For now though, it is already very good at hosting static content, which is what I will show you how to do now.</p>
<h2>What does it mean for my website to be on IPFS?</h2>
<p>If you can put your website on IPFS (any sort of mutability makes it a challenge, static websites like this one, though, are trivial), then it means it can very easily get decentralized: anyone (or you, on other servers) can &ldquo;pin&rdquo; the content of your website, that is, host and distribute a partial or complete copy of it. As long as some node holds a copy of your website, it will be available! For example, if you like this website and you have the IPFS tool installed (more on that later), you could simply run <code>ipfs pin add /ipns/nullreference.ch</code> and hold a copy you, or anyone connected to you through IPFS can access.</p>
<p>Be careful what you publish on IPFS, though: since only one copy on the IPFS network is required for any content to be served, once someone pins your content <em>you cannot take it down</em>. Do not publish sensitive data on IPFS unless you use and trust encryption.</p>
<h2>Installing IPFS on a server</h2>
<blockquote class="warning"><p> Being under heavy development, IPFS may have security issues. I <em>heavily suggest</em> you run IPFS in some sandboxed environment such as a Docker container, for example.</p></blockquote>
<p>I could actually write a tutorial about the installation process for IPFS, but I fear it would be soon deprecated by new developments in the upstream project. For that reason I will just direct you to <a href="https://github.com/ipfs/go-ipfs">the official GitHub repository</a> whose description is detailed enough and will be kept up to date.</p>
<h2>Publishing your website</h2>
<p>I will assume you just installed <em>go-ipfs</em>. If this is the case, the first step is to run <code>ipfs init</code> which will create an object store, and default configurations. You will normally find those under <code>~/.ipfs/</code>. Go ahead and take a look! The default configuration should suit our needs for now, though.</p>
<p>First step to publish content is to start the daemon. It will be responsible for interfacing you with the rest of the network. As far as I know the daemon itself cannot fork to the background, so if that is something you need you&rsquo;ll have to run it in the background by yourself. You can start the daemon by running <code>ipfs daemon</code>.</p>
<p>IPFS lets you easily add any file, and even directories to the network. This can be done with the <code>ipfs add &lt;file&gt;</code> which adds files to your local node. Use the <code>--recursive</code> option to add directories. Note that the files you add now <em>only be present on your node</em> unless someone decides to pin it. Until then bringing your node down brings those objects down with it, and you can still remove your files from the network. You cannot rely on that, though: there is never a guarantee noone has pinned your objects. When I want to publish a version of this website, I go to its root and run the following:</p>
<code class="block">
	<span class="shellprompt shellout">nullreference.ch/ $</span> <span class="shellin">ipfs add --recursive ./</span><br />
	<span class="shellout">added QmQx7tH8uPje88YffkBJqKqEf6WCUAb3jveDs2WB9CZByw nullreference.ch/assets/pubkey.txt</span><br />
	<span class="shellout">added QmQLiauYThX3nBvVRP4hjAXJXXPcm2uzGxmUxg9BTEfqP5 nullreference.ch/index.html</span><br />
	<span class="shellout">added QmYATFwSe3X5RyxKtfNRNQsqGRtwtQRUzkEexZEEXjofDK nullreference.ch/reversed-subscripting.html</span><br />
	<span class="shellout">added QmRXvugNR2RAaUkzKtdodAYMnSbfMLmgPS1oLBARF76Auy nullreference.ch/style/common-dark.css</span><br />
	<span class="shellout">added QmfTxAmiEcwEkVznUpeA7eAJkkpDbZXNq31nwZMKAH6H7h nullreference.ch/style/common-light.css</span><br />
	<span class="shellout">added Qmeqb9CUq51fopbcZjdLKLR25xnWyQZc9v4hbkUYbn3EcP nullreference.ch/style/fonts/crimsontext-bold.ttf</span><br />
	<span class="shellout">added QmPQR1FaDrbM79Nob241rSscAgWvpTmDrAKNMdz6d3tnep nullreference.ch/style/fonts/crimsontext-bolditalic.ttf</span><br />
	<span class="shellout">added QmYS6hzZSh6hsfiFUntU5xFMbfF9qu81XWnVTDvz7G4EnE nullreference.ch/style/fonts/crimsontext-italic.ttf</span><br />
	<span class="shellout">added Qmbxs9Qntm9zGgcJvQbCbQuwNA6NEeBBE7zDvKKcVj9aUL nullreference.ch/style/fonts/crimsontext-sspanibold.ttf</span><br />
	<span class="shellout">added QmcHybGUG9UvweR3PHDnxaMSu4tWMrGQLrJxWCDD6JjgeU nullreference.ch/style/fonts/crimsontext-sspanibolditalic.ttf</span><br />
	<span class="shellout">added QmULRmTQSJo5t1uACEBz89ebpdR1a3K1xqqspUo7S1c3z6 nullreference.ch/style/fonts/crimsontext.ttf</span><br />
	<span class="shellout">added QmPPf2WkfCvd6i6M15UehWrsK8J6HasFjjmNRvJsW3Fhzz nullreference.ch/style/fonts/opensans-bold.ttf</span><br />
	<span class="shellout">added QmaAWqdKEHw1W7R4EGXxVXKJu1e7eJBbib5oNdfSN6rVjc nullreference.ch/style/fonts/opensans-bolditalic.ttf</span><br />
	<span class="shellout">added QmWYEXEiL73M7rzr6SWKawiNoYWZmD8v9FBfPC2zXMiKuZ nullreference.ch/style/fonts/opensans-extrabold.ttf</span><br />
	<span class="shellout">added QmNvrAX7MdpogVxgE5SJd3qEKWk1UAKbaQx69RoL3RWFEP nullreference.ch/style/fonts/opensans-extrabolditalic.ttf</span><br />
	<span class="shellout">added QmdFLdNiTDGmU1Q61YUc68s7H9QW9qLtTAcZCoaNfsyELA nullreference.ch/style/fonts/opensans-italic.ttf</span><br />
	<span class="shellout">added QmVg81Ju4eeKJxneJdScQ1LbraQ1mXiDD9pGBqeihyC1wn nullreference.ch/style/fonts/opensans-light.ttf</span><br />
	<span class="shellout">added Qme9RmvTWv2jyYFYYkJJKqW2exvTmXmr44NcEYLTMTmm7t nullreference.ch/style/fonts/opensans-sspanibold.ttf</span><br />
	<span class="shellout">added Qmd8EEsJzKo7EqYnaDKTyhF1CSrR6bfNCVHgWyJQCTRaY2 nullreference.ch/style/fonts/opensans-sspanibolditalic.ttf</span><br />
	<span class="shellout">added QmP1B8KmrWVRkGaTf1xpGuEp9mpBvU1PWoE22trPPNNjH4 nullreference.ch/style/fonts/opensans.ttf</span><br />
	<span class="shellout">added QmXbycN51KFprcn2fWmoWM7QAP9wcNFqwKrpe8QmyFr2Tw nullreference.ch/style/fonts/opensanslight-italic.ttf</span><br />
	<span class="shellout">added QmTQYMNmWQYUE4tdHTcTY6KtFhuPtqp7SaVgTbBQfhbDw4 nullreference.ch/style/head_bg.jpg</span><br />
	<span class="shellout">added QmSaUetfxig7vKWwaPF2x6rKHGnZeacCEsLDGo5MDd5YJ1 nullreference.ch/assets</span><br />
	<span class="shellout">added QmUbopB96DJQyzQxTmwSf2U87kjp5ZHUZptCARzi3qWfhD nullreference.ch/style/fonts</span><br />
	<span class="shellout">added QmQtHypvFHWZz8Xcos8WEwBKMEtUjRe59s1bEtPm4W7Mos nullreference.ch/style</span><br />
	<span class="shellout">added QmPTdY7tZpnWnJxhH3QDwHAiGNJaYMq7U3T2iSmxGm27YU nullreference.ch</span><br />
	<sub class="lang">Shell</sub>
</code>
<p>What we are interested in is that last line <em>which contains the hash of the root of your website</em>. In IPFS every object has a hash, which acts as an address for that object. This is why IPFS is a <em>content-addressable store</em>: the address of an object is derived from its content. Were I to modify any of this content, the address would end up different. Also it is very easy for a client to verify an object matches its address, so <em>you can always be sure what you received from IPFS is what you were supposed to receive</em>: there can be no corruption, intentional or not.</p>
<p>If you have the daemon running, you can try to access <code>http://localhost:8080/ipfs/&lt;YOUR ROOT HASH&gt;/</code>; you should see your website. Otherwise you can try with my current root hash: <code>QmPTdY7tZpnWnJxhH3QDwHAiGNJaYMq7U3T2iSmxGm27YU</code>; you should end up on this website as it looks like while I am writing this (unless there is no node to provide those objects, which I will try to avoid). By default the IPFS daemon runs an HTTP gateway on localhost port 8080, but there are also online gateways, such as IPFS&rsquo; official website: if you replace <code>http://localhost:8080</code> by <code>https://ipfs.io</code> you should still end up on your content: the official gateway fetched the content from your node and sent it back to you through HTTP!</p>
<p>Now your content is actually published on IPFS. Congratulations! However it is only accessible through that awful hash no one could possibly remember. Not a great way to attract visitors. Also every time you will make a change to your website, that hash will change and unless you can give everyone that new hash each time, your visitors will be stuck on a single version. Completely unrealistic. For this reason, IPFS comes accompanied by <em>The Inter-Planetary Name System</em> which will let you have a domain name point to an IPFS object, in a mutable way!</p>
<h2>Giving your web site a human-useable name</h2>
<p>To create a name mutably pointing to an object, simply run <code>ipfs name publish &lt;YOUR ROOT HASH&gt;</code>.</p>
<code class="block">
	<span class="shellout shellprompt">~/ $</span> <span class="shellin">ipfs name publish QmPTdY7tZpnWnJxhH3QDwHAiGNJaYMq7U3T2iSmxGm27YU</span><br />
	<span class="shellout">Published to QmQArKLQkH76TFCA6iEs9PN2RAt5v1VwuozqYdE1BiUzgo: /ipfs/QmPTdY7tZpnWnJxhH3QDwHAiGNJaYMq7U3T2iSmxGm27YU</span><br />
	<sub class="lang">Shell</sub>
</code>
<p>Everytime this command is run on another object, it publishes it to the same address: for example <code>/ipns/QmQArKLQkH76TFCA6iEs9PN2RAt5v1VwuozqYdE1BiUzgo</code> will <em>always</em> point to the latest root of this website as long as I update each at each change. This name is generated from the keypair named <code>self</code> that was generated for your node when you ran <code>ipfs init</code> (keypairs can be managed with <code>ipfs key</code>). Doing this from another node or with another key will yield a different name. This solves the problem of being able to change the content of your website without having to redistribute new hashes each time you change a thing. However this name is no better than an object hash in terms of legibility.</p>
<p>In order to give a human-useable name to your IPFS content, you need to own a domain name. If you don&rsquo;t have one you are stuck with using the IPNS hash. However if you do, using your domain name for your IPFS content is as simple as adding a <code>TXT</code> to your DNS zone. IPFS needs you to add a <code>TXT</code> record with the value <code>"dnslink=&lt;YOUR IPNS HASH&gt;"</code>. Note that using this method you can point to either a IPNS hash or an IPFS object hash; for that reason you must not omit the <code>/ipns/</code> or <code>/ipfs/</code> prefix of the hash. For example the record for this website looks like this:</p>
<code class="block">
nullreference.ch. <span class="type">IN</span> <span class="type">TXT</span> <span class="string">"dnslink=/ipns/QmQArKLQkH76TFCA6iEs9PN2RAt5v1VwuozqYdE1BiUzgo"</span><br/>
<sub class="lang">DNS</sub>
</code>
<p>With this done, any place that accepts an IPNS name, including IPFS gateways, will let you use <code>/ipns/&lt;YOUR DOMAIN NAME&gt;</code> to fetch your content. You can try it now with this website using <a href="https://localhost:8080/ipns/nullreference.ch/">your local gateway</a> or <a href="https://ipfs.io/ipns/nullreference.ch/">the official gateway</a>.</p>
<h2>Where to go from now?</h2>
<p>With that you should be able to publish any static website to IPFS for resistance to censorship, network instability, or dead links (for many reasons, decentralized content-addressable storage is a very good way to store data in a way resistant to time). However in many cases static will not cut it and interactivity is needed. In the case of IPFS this is not yet a solved problem: there is no known easy way to convert any centralized service into a decentralized one and decentralization has to be at the core of the design, from the beginning. However some have already made some services such as a <a href="https://chat.ipfs.io">text chat</a> or <a href="https://hardbin.com/">a paste service</a>. Those are possible as browser can run a working JS implementation of IPFS to dynamically interact with the network. We can expect development of fully decentralized services using IPFS to become simpler with time as features such as encryption or pub/sub messaging become available.</p>
<p class="article-date article-date-footer"><time datetime="2017-06-22">June 22, 2017</time></p>
</article>]]></content>
<author>
<name>Victor Schubert</name>
<email>v@schu.be</email>
</author>
</entry>
<entry>
<title>Reversed Array Subscripting in C/C++</title>
<link href="https://schu.be/reversed-subscripting.html" />
<link href="https://schu.be/reversed-subscripting.html" rel="alternate" type="text/html" />
<id>https://schu.be/reversed-subscripting.html</id>
<published>2017-02-07T10:00:00Z</published>
<updated>2017-02-07T10:00:00Z</updated>
<content type="html"><![CDATA[<article>
<p>
Ok, so this one is about something I'd qualify as a <em>party trick</em>:
it's fun to do and usually very few people understand why it
works. I seriously advise <em>against</em> ever doing that in real code as
it makes your code <em>a lot</em> more confusing.
</p>

<p>
If you've done some C or C++ before, you certainly know how arrays
work and how you access their elements with the <em>subscript
operator</em>, using the following syntax.
</p>

<pre class="src src-c"><span class="src-preprocessor">#include</span> <span class="src-string">&lt;stdlib.h&gt;</span>
<span class="src-preprocessor">#include</span> <span class="src-string">&lt;stdio.h&gt;</span>

<span class="src-type">int</span> <span class="src-function-name">main</span>(<span class="src-type">void</span>)
{
    <span class="src-type">int</span> <span class="src-variable-name">array</span>[] = {2, 3, 5, 7}; <span class="src-comment-delimiter">/* </span><span class="src-comment">`array' is now an array of four integers</span><span class="src-comment-delimiter"> */</span>

    printf(<span class="src-string">"%d\n"</span>, array[2]); <span class="src-comment-delimiter">/* </span><span class="src-comment">will print `5'</span><span class="src-comment-delimiter"> */</span>
    <span class="src-keyword">return</span> EXIT_SUCCESS;
}
</pre>

<p>
Once compiled, this very short snippet will allocate an array of
four integers initialized with some values, read the third element
and print it to the standard output. But now let us alter that code
just a little bit.
</p>

<pre class="src src-c">printf(<span class="src-string">"%s\n"</span>, 2[array]);
</pre>

<p>
Ok. <em>What in hell is that?</em> You can try to compile it and it will
still print <code>11</code>. Enable the warnings and you'll see your compiler's
not even complaining! The fact is: this is an absolutely valid and
absolutely equivalent code. It does make some sense when you look
how the subscript operator works behind the scenes. According to the
<cite>May 13, 1988 ANSI C Standard Draft</cite>
the subscript operator is defined as so.
</p>

<blockquote>
<p>
The definition of the subscript operator <code>[]</code> is that <code>E1[E2]</code> is
identical to <code>(*(<wbr>E1+(<wbr>E2)))</code>.
</p>
</blockquote>

<p>
This means something <em>very</em> interesting. Since <code>array[n]</code> is
equivalent to <code>*(<wbr>array + n)</code> and because addition is commutative,
then <code>*(<wbr>array + n)</code> is the same as <code>*(<wbr>n + array)</code>, which according
to the standard is equivalent to <code>n[array]</code>.
</p>
<p class="article-date article-date-footer"><time datetime="2017-02-07">February 7, 2017</time></p>
</article>]]></content>
<author>
<name>Victor Schubert</name>
<email>v@schu.be</email>
</author>
</entry>
<entry>
<title>Hash collisions in OCaml polymorphic variants</title>
<link href="https://schu.be/til-ocaml-polymorphic-variant-hash-collisions.html" />
<link href="https://schu.be/til-ocaml-polymorphic-variant-hash-collisions.html" rel="alternate" type="text/html" />
<id>https://schu.be/til-ocaml-polymorphic-variant-hash-collisions.html</id>
<published>2020-05-13T10:00:00Z</published>
<updated>2020-05-13T10:00:00Z</updated>
<content type="html"><![CDATA[<article>
<p>
Polymorphic variants in OCaml compile down to integers (if they
don’t have arguments). As opposed to IDs chosen sequentially for
non-polymorphic variants, these integers are chosen by hashing the
value’s name. For example, value <code>`Foo</code> is given the
integer value 3505894.
</p>

<p>
As with any hashing algorithm, the algorithm used here is subject to
collisions, for example according to <a href="https://caml-list.inria.narkive.com/oQ1aVJEr/hash-clash-in-polymorphic-variants">this thread on the Caml mailing
list</a> values <code>`Eric_<wbr>Cooper</code>, <code>`azdwbie</code> and <code>`c7diagq</code> all hash to
integer value -332323982.
</p>

<p>
Thankfully this will not cause issues in practice as the OCaml
compiler is smart enough to fail whenever collisions occur within a
polymorphic variant type. Trying this with the OCaml REPL fails as
follows.
</p>

<pre class="example">
# type collision = [`Eric_Cooper | `azdwbie];;
Error: Variant tags `azdwbie and `Eric_Cooper have the same hash value.
       Change one of them.
</pre>
<p class="article-date article-date-footer"><time datetime="2020-05-13">May 13, 2020</time></p>
</article>]]></content>
<author>
<name>Victor Schubert</name>
<email>v@schu.be</email>
</author>
</entry>
<entry>
<title>Secure indexes</title>
<link href="https://schu.be/til-secure-indexes.html" />
<link href="https://schu.be/til-secure-indexes.html" rel="alternate" type="text/html" />
<id>https://schu.be/til-secure-indexes.html</id>
<published>2020-06-15T10:00:00Z</published>
<updated>2020-06-15T10:00:00Z</updated>
<content type="html"><![CDATA[<article>
<h2 id="a-primer-on-bloom-filters">A primer on Bloom filters</h2>
<p>
<a href="https://en.wikipedia.org/wiki/Bloom_filter">Bloom filters</a> are a data structure which encodes a set of items,
with some special properties.
</p>

<ul>
<li>Items can never be removed.</li>
<li>The structure is very memory-efficient.</li>
<li>There can be false positives when testing for presence of an
element in the set.</li>
<li>There can never be a false negative however.</li>
</ul>

<p>
Bloom filters rely on a hash function to work. It will hash
elements which are added to the structure and hash elements which
are tested against the set. At a lower level, the set only
contains hashes of items.
</p>

<p>
We can use Bloom filters to produce efficient search indexes: make
the bloom filter containing all words from a document; do the same
for every document you want to be able to search, and now instead
of scanning each document you can just test your search query
against each filter to know which documents (likely) contain your
search terms.
</p>

<h2 id="secure-indexes">Secure indexes</h2>
<p>
I came across <a href="https://crypto.stanford.edu/~eujin/papers/secureindex/index.html">secure indexes</a> as I was researching how to bring
full-text search to end-to-end encrypted documents stored on a
remote server. Bloom filters would be undesirable in that case
because they leak information about the document’s contents. For
example if we were encrypting invoices and I wanted to know whether
companies Foo and Bar work together I could try to find invoices
matching both “Foo” and “Bar” and deduce with some level of
confidence that they are partners or not, depending on how many
documents match.
</p>

<p>
A naïve approach to secure indexes is to see them as Bloom filters
where the hash function also depends on a secret. In effect we can
build secure indexes simply by replacing the hash function from a
Bloom filter implementation by an HMAC function. Provided that the
secret is identical for all documents and known only to the client,
we can implement efficient search over encrypted documents with
this construct. To perform a search the user only needs to generate
the “trapdoor” for the search terms. This happens to be identical
to a secure index containing all words from the search query. With
the trapdoor, the server can iterate over all secure indexes,
returning a positive answer for each index which contains all bits
from the trapdoor. Such a mechanism has the following
properties:
</p>

<ul>
<li>The server knows nothing of the contents of documents and indices
besides an approximation of the amount of distinct words.</li>
<li>The server knows nothing of the search terms, besides an
approximation of the amount of distinct words.</li>
<li>Comparing the search terms with a secure index is nothing more
than a bitwise-and followed by a comparison.</li>
</ul>
<p class="article-date article-date-footer"><time datetime="2020-06-15">June 15, 2020</time></p>
</article>]]></content>
<author>
<name>Victor Schubert</name>
<email>v@schu.be</email>
</author>
</entry>
<entry>
<title>Monospace font size fix</title>
<link href="https://schu.be/til-monospace-monospace.html" />
<link href="https://schu.be/til-monospace-monospace.html" rel="alternate" type="text/html" />
<id>https://schu.be/til-monospace-monospace.html</id>
<published>2020-06-15T10:00:00Z</published>
<updated>2020-06-15T10:00:00Z</updated>
<content type="html"><![CDATA[<article>
<p>
I remember that when writing the stylesheet for this website I had
issues sizing the monospace font used for code snippets. Most
usually it would show up very small compared to the rest of the text
even though I wouldn’t set it to another <code>font-<wbr>size</code>. That would
happen only for the plain <code>monospace</code> font, not any other webfont or
named font. Today I came across <a href="http://code.iamkate.com/html-and-css/fixing-browsers-broken-monospace-font-handling/">this webpage</a> recommending the
following CSS properties to fix the monospace font’s sizing on all
browsers.
</p>

<pre class="src src-css"><span class="src-css-property">font-family</span>: monospace, monospace;
<span class="src-css-property">font-size</span>: 1em;
</pre>

<p>
Sure enough, monospaced text renders with a much more harmonious
size when its font is set to ~monospace, monospace~… Sadly I can’t
find a straight answer as to why this works.
</p>
<p class="article-date article-date-footer"><time datetime="2020-06-15">June 15, 2020</time></p>
</article>]]></content>
<author>
<name>Victor Schubert</name>
<email>v@schu.be</email>
</author>
</entry>
<entry>
<title>Tor hidden service and unix domain socket permissions</title>
<link href="https://schu.be/til-onion-socket-permissions.html" />
<link href="https://schu.be/til-onion-socket-permissions.html" rel="alternate" type="text/html" />
<id>https://schu.be/til-onion-socket-permissions.html</id>
<published>2020-07-02T10:00:00Z</published>
<updated>2020-07-02T10:00:00Z</updated>
<content type="html"><![CDATA[<article>
<p>
A while ago I was trying to get this website reachable through Tor
as a hidden service. I already had a service running which would
expose a port on the localhost as a service, however I was not super
satisfied with this solution: I did not want to take up a port for
that and nothing else on the machine is supposed to connect to it
really so I wanted to use a Unix domain socket.
</p>

<p>
Turns out, it is very easy both to configure Nginx to listen on a
Unix domain socket and to configure Tor to expose such a socket as a
hidden service.
</p>

<pre class="src src-conf"><span class="src-comment-delimiter"># </span><span class="src-comment">server directive in nginx.conf</span>
<span class="src-type">server</span> {
  listen unix:/path/to/the/socket
  &#8230;

<span class="src-comment-delimiter"># </span><span class="src-comment">hidden service configuration in torrc</span>
HiddenServicePort 80 unix:/path/to/the/socket
</pre>

<p>
I could not get it to work initially; the browser could not connect
to the service. Since I already had a working service which worked
fine (and used a port on localhost), I first checked that Tor wasn’t
at fault by changing the <code>HiddenServicePort</code> directive to point to
the blog on localhost. I was getting a 404 but at least I connected
and got a response from Nginx. Tor wasn’t at fault. Thinking maybe
Nginx wasn’t properly setting up the socket, I connected to it
directly using <code>socat</code> and wrote a simple <code>GET / HTTP/<wbr>1.1</code>; got an
answer.
</p>

<p>
With both Tor and Nginx confirmed to be doing their job, it started
to dawn on me: domain sockets are files, and have permissions. I had
forgotten to set the permissions. Some configuration and a <code>chown</code>
later I had a working hidden service. This website can now be
accessed at <span
  class="breakable"><a href="http://b5ec6jsfe2oyrqlt4od67bw7lyk2v77paixokjoq32xsdilvcuyeh5id.onion/">http://b5ec6jsfe2oyrqlt4od67bw7lyk2v77paixokjoq32xsdilvcuyeh5id.onion/</a></span>.
</p>
<p class="article-date article-date-footer"><time datetime="2020-07-02">July 2, 2020</time></p>
</article>]]></content>
<author>
<name>Victor Schubert</name>
<email>v@schu.be</email>
</author>
</entry>
<entry>
<title>Advertising an onion service with Onion-Location</title>
<link href="https://schu.be/til-onion-location.html" />
<link href="https://schu.be/til-onion-location.html" rel="alternate" type="text/html" />
<id>https://schu.be/til-onion-location.html</id>
<published>2020-07-09T10:00:00Z</published>
<updated>2020-07-09T10:00:00Z</updated>
<content type="html"><![CDATA[<article>
<p>
Many websites make themselves available through Tor as hidden
services to help users preserve their privacy and circumvent blocks
and censorship. A sample follows.
</p>

<table>


<colgroup>
<col  class="org-left" />

<col  class="org-left" />
</colgroup>
<thead>
<tr>
<th scope="col" class="org-left">Clearnet domain</th>
<th scope="col" class="org-left">Onion domain</th>
</tr>
</thead>
<tbody>
<tr>
<td class="org-left"><a href="https://duckduckgo.com">duckduckgo.com</a></td>
<td class="org-left"><a href="http://3g2upl4pq6kufc4m.onion">3g2upl4pq6kufc4m.onion</a></td>
</tr>

<tr>
<td class="org-left"><a href="https://www.torproject.org">www.torproject.org</a></td>
<td class="org-left"><a href="http://expyuzz4wqqyqhjn.onion">expyuzz4wqqyqhjn.onion</a></td>
</tr>

<tr>
<td class="org-left"><a href="https://www.propublica.org">www.propublica.org</a></td>
<td class="org-left"><a href="http://propub3r6espa33w.onion">propub3r6espa33w.onion</a></td>
</tr>

<tr>
<td class="org-left"><a href="https://facebook.com">facebook.com</a></td>
<td class="org-left"><a href="http://facebookcorewwwi.onion">facebookcorewwwi.onion</a></td>
</tr>

<tr>
<td class="org-left"><a href="https://keybase.io">keybase.io</a></td>
<td class="org-left"><a href="http://keybase5wmilwokqirssclfnsqrjdsi7jdir5wy7y7iu3tanwmtp6oid.onion">keybase5wmilwokqirssclfnsqrjdsi7jdir5wy7y7iu3tanwmtp6oid.onion</a></td>
</tr>

<tr>
<td class="org-left"><a href="https://protonmail.ch">protonmail.ch</a></td>
<td class="org-left"><a href="http://protonirockerxow.onion">protonirockerxow.onion</a></td>
</tr>

<tr>
<td class="org-left"><a href="https://schu.be">schu.be</a></td>
<td class="org-left"><a href="http://b5ec6jsfe2oyrqlt4od67bw7lyk2v77paixokjoq32xsdilvcuyeh5id.onion">b5ec6jsfe2oyrqlt4od67bw7lyk2v77paixokjoq32xsdilvcuyeh5id.onion</a></td>
</tr>
</tbody>
</table>

<p>
Until recently it has been a challenge to discover the hidden
service address for any website. Some advertise their onion service
in their footer (Keybase, Protonmail), but it is otherwise usually
hard to find out. Thankfully the latest version of the Tor browser
(version 9.5) implements <a href="https://gitweb.torproject.org/tor-browser-spec.git/tree/proposals/100-onion-location-header.txt">the Onion-Location spec</a>. As explained by
the Tor Project’s <a href="https://community.torproject.org/onion-services/advanced/onion-location/">helpful explanation</a> it allows websites to use
either an HTTP response header or an HTML meta tag to advertise an
onion address for a website. Once set up, visitors who reach the
clearnet website will be shown a nice button which redirects them to
the onion service. The browser can also be configured to do this
always, automatically.
</p>

<img src="assets/onion-available.png" alt="The Tor browser’s address bar,
showing a URL from the Tor Project’s website and a bright button reading
“.onion available”." width="693" height="38" />

<p>
Again, this can be triggered in two ways. Either the HTTP response
from the webserver includes the <em>Onion Location</em> header as follows.
</p>

<pre class="example">
Onion-Location: someonionaddress.onion
</pre>

<p>
Alternatively, the same behaviour can be obtained by adding a meta
tag in the HTML document itself.
</p>

<pre class="src src-html">&lt;<span class="src-function-name">meta</span>
  <span class="src-variable-name">http-equiv</span>=<span class="src-string">"onion-location"</span>
  <span class="src-variable-name">content</span>=<span class="src-string">"someonionaddress.onion"</span>&gt;
</pre>

<p>
Of course this is now enabled on this website!
</p>
<p class="article-date article-date-footer"><time datetime="2020-07-09">July 9, 2020</time></p>
</article>]]></content>
<author>
<name>Victor Schubert</name>
<email>v@schu.be</email>
</author>
</entry>
<entry>
<title>Things not to do with string functions</title>
<link href="https://schu.be/things-not-to-do-with-string-functions.html" />
<link href="https://schu.be/things-not-to-do-with-string-functions.html" rel="alternate" type="text/html" />
<id>https://schu.be/things-not-to-do-with-string-functions.html</id>
<published>2020-07-23T10:00:00Z</published>
<updated>2020-07-23T10:00:00Z</updated>
<content type="html"><![CDATA[<article>
<p>
Whatever the programming language or framework you are using, you are most
likely familiar with the string-handling functions you have at your disposal.
You probably even wield <code>concat</code>, <code>replace</code>, <code>match</code> and <code>split</code> like as many
ninja weapons! However sometime the hard part is not to solve an issue with
strings, rather it is to recognize when you should restrain from using these
otherwise tried-and-true tools and take another approach, lest your code be
broken or insecure. A famous example of this is the Stack Overflow question
“<a href="https://stackoverflow.com/questions/1732348/regex-match-open-tags-except-xhtml-self-contained-tags/">RegEx match open tags except XHTML self-contained tags</a>” where <a href="https://stackoverflow.com/users/142233/jeff">Jeff</a> learns that
regular expressions are not the right tool when it comes to parsing (X)HTML.
</p>

<p>
With this article I’ll try to highlight some tasks which at first glance, seem
like they could be accomplished using string-handling functions and regular
expressions, while going down that path only leads to much sadness.
</p>

<h2 id="matching-urls">Matching URLs</h2>
<p>
Let’s imagine you are building the new awesome social network where users can
keep in touch with their friends and family, have constructive debate and
discover new ideas. In order to protect your community you want to forbid any
link to a website outside the domains you control. More specifically, you want
to redact any URL which points to a URL which is not part of your
https://<wbr>awesome.<wbr>example.<wbr>com website. The code which will differentiate between
allowed and disallowed URLs may look something like this.
</p>

<pre class="src src-javascript"><span class="src-keyword">function</span> <span class="src-function-name">isUrlAllowed</span>(<span class="src-variable-name">url</span>) {
  <span class="src-keyword">return</span> Boolean(url.match(<span class="src-string">'awesome.example.com'</span>))
}
</pre>

<p>
Your users cannot post links to other websites anymore. https://<wbr>wikipedia.<wbr>org
certainly does not contain “awesome.<wbr>example.<wbr>org”, therefore it is
forbidden. Mission accomblished! Right?
</p>

<p>
Of course not. Your astute users have quickly caught-on and started using a neat
trick! Rather than posting a link to <a href="https://wikipedia.org">https://wikipedia.org</a>, they can post a link
to https://<wbr>wikipedia.<wbr>org#<wbr>awesome.<wbr>example.<wbr>org.  This is a perfectly valid URL
which points where it is supposed to, with the added benefit that it goes right
through your filter.
</p>

<p>
Alright then. Let’s pour some more work into this function. Here’s the next
iteration you might come up with.
</p>

<pre class="src src-javascript"><span class="src-keyword">function</span> <span class="src-function-name">isUrlAllowed</span>(<span class="src-variable-name">url</span>) {
  <span class="src-keyword">return</span> Boolean(url.match(<span class="src-string">/^(https?:\/\/)?awesome.example.com/</span>))
}
</pre>

<p>
“Surely this ought to do it!” you may be thinking. Of course, one of your more
astute users found yet another way to circumvent your filter. This user owns the
domain “astute.xyz” and started hosting a URL shortening service at
https://<wbr>awesome.<wbr>example.<wbr>com.<wbr>astute.<wbr>xyz. Now each and every one of your users can
use this service to post links to wherever they wish, since the URLs now all
start with “https://<wbr>awesome.<wbr>example.<wbr>com”, which is exactly what you are
matching.
</p>

<p>
This issue (not this usecase thankfully) is one I have encountered on real,
production code. During an audit of the codebase the issues with this approach
were pointed out to us and the fix was revealed to be easy and elegant. Your
language or framework of choice probably has facilities to parse URLs for you
already. Instead of building some brittle regular expression or string-handling
machinery, you can just use tried-and-true standard library functions. In
Javascript, it looked like this.
</p>

<pre class="src src-javascript"><span class="src-keyword">function</span> <span class="src-function-name">isUrlAllowed</span>(<span class="src-variable-name">url</span>) {
  <span class="src-keyword">const</span> <span class="src-variable-name">parsedUrl</span> = <span class="src-keyword">new</span> <span class="src-type">URL</span>(url)
  <span class="src-keyword">return</span> parsedUrl.host === <span class="src-string">'awesome.example.org'</span>
}
</pre>

<p>
URLs are more complex beasts than they may look like initially, best to let some
well-established library parse it.
</p>

<h2 id="concatenating-file-paths">Concatenating file paths</h2>
<p>
Now let’s say you wish to allow your users to upload files through your
brand-new desktop app. For some (very questionable) reasons you decided to have
users write the path of the file they wish to upload relative to their home
directory. In order to load the file, you write the following.
</p>

<pre class="src src-javascript"><span class="src-keyword">function</span> <span class="src-function-name">uploadFile</span>() {
  <span class="src-keyword">const</span> <span class="src-variable-name">pathInHome</span> = promptUserForUploadedFilePath()
  <span class="src-keyword">const</span> <span class="src-variable-name">path</span> = process.env.HOME + pathInHome
  <span class="src-keyword">return</span> readFile(path)
}
</pre>

<p>
Many things can go wrong. If as a user I want to upload the file located under
/home/me/Pictures/cute-cat.png, I’d be tempted to input
“Pictures/cute-cat.png”. Given that you don’t necessarily know whether the HOME
environment variable ends with a path separator (it usually does not) you could
end up in quite a predicament when you then try to read the file
/home/mePictures/cute-cat.png. The obvious way to fix it is to simply
concatenate with a path separator between the two fragments.
</p>

<pre class="src src-javascript"><span class="src-keyword">function</span> <span class="src-function-name">uploadFile</span>() {
  <span class="src-keyword">const</span> <span class="src-variable-name">pathInHome</span> = promptUserForUploadedFilePath()
  <span class="src-keyword">const</span> <span class="src-variable-name">path</span> = process.env.HOME + <span class="src-string">'/'</span> + pathInHome
  <span class="src-keyword">return</span> readFile(path)
}
</pre>

<p>
This might be fine if you distribute your app only for GNU/Linux and OS X but it
will definitely break down on Windows. You can do some OS detection to include
either the forward slash found in UNIX-like OSes or the backslash found on
Windows but this sounds like something that should be handled by your standard
library. Turns out it often is!
</p>

<pre class="src src-javascript"><span class="src-keyword">const</span> <span class="src-variable-name">path</span> = require(<span class="src-string">'path'</span>)

<span class="src-keyword">function</span> <span class="src-function-name">uploadFile</span>() {
  <span class="src-keyword">const</span> <span class="src-variable-name">pathInHome</span> = promptUserForUploadedFilePath()
  <span class="src-keyword">const</span> <span class="src-variable-name">path</span> = path.join(process.env.HOME, pathInHome)
  <span class="src-keyword">return</span> readFile(path)
}
</pre>

<p>
This operation is often found under the name <code>path.<wbr>join</code>, for example it is
<code>os.<wbr>path.<wbr>join</code> in Python, <code>File.<wbr>join</code> in Ruby or even
<code>std::<wbr>filesystem::<wbr>path::<wbr>append</code> in C++ (the usage for that one looks super
weird). These implementations will be perfectly capable of handling extra or
missing separators, or relative and absolute paths.
</p>

<h2 id="matching-email-addresses">Matching email addresses</h2>
<p>
Ah, good old venerable email. Anytime you need to work with email you can be
sure things will be more complicated than what initially planned. By a lot. It
starts at the simple question: what is an email address? Let’s say you want to
be helpful to your users and have your form validate in real time. Users should
only be able to submit their email address if it is valid. You could write
something like this. (I have seen a similar function in production.)
</p>

<pre class="src src-javascript"><span class="src-keyword">function</span> <span class="src-function-name">isEmailValid</span>(<span class="src-variable-name">email</span>) {
  <span class="src-keyword">return</span> <span class="src-string">/[a-z0-9-]+@([a-z0-9-]+\.)+[a-z]{2,3}/</span>.test(email)
  <span class="src-comment-delimiter">// </span><span class="src-comment">One or more alphanumeric characters or dashes,</span>
  <span class="src-comment-delimiter">// </span><span class="src-comment">then the @ symbol,</span>
  <span class="src-comment-delimiter">// </span><span class="src-comment">then one or more alphanumeric characters or dashes,</span>
  <span class="src-comment-delimiter">// </span><span class="src-comment">followed by a dot,</span>
  <span class="src-comment-delimiter">// </span><span class="src-comment">at least once,</span>
  <span class="src-comment-delimiter">// </span><span class="src-comment">then two or three alphabetic characters.</span>
}
</pre>

<p>
A few things can go wrong with this approach.
</p>

<ul>
<li>What happens if the address includes a <em>comment</em>? Those look like this:
username+comment@example.<wbr>com. They sometimes map to multiple inboxes, or the
user can also simply have triage rules depend on them. People <em>do</em> use those.</li>
<li>This regular expression might have worked in the old days when we did not have
fancy TLDs such as .berlin, .museum, .flowers or .pizza, however now all bets
are off. The longest TLD in <a href="https://data.iana.org/TLD/tlds-alpha-by-domain.txt">the IANA’s official list</a> to date is the
24-characters monster .xn--vermgensberatung-pwb, which will show up as
.vermögensberatung in your browser thanks to the magic of <a href="https://en.wikipedia.org/wiki/Punycode">Punycode</a>.</li>
<li>This will not catch many other obscure features of e-mail addresses. Wikipedia
has <a href="https://en.wikipedia.org/wiki/Email_address#Examples">a very surprising list of valid emails</a> to illustrate this.</li>
</ul>

<p>
My recommendation for this is quite simple: don’t validate email-addresses
yourself. You’ll find many articles on the net with behemoth regular expressions
claiming to match all email addresses perfectly; perhaps one of them does, but
the chances are low. With HTML5 browsers have actually been given the ability to
do some powerful form validation: rather than coming up with your own matching
logic you can just delegate to the browser. Simply make sure you give your
inputs the “email” type.
</p>

<pre class="src src-html">&lt;<span class="src-function-name">input</span> <span class="src-variable-name">type</span>=<span class="src-string">"email"</span> required /&gt;
</pre>

<p>
If you do that however you need to remember: browsers are free to define their
own algorithm. “But, this means I still need to have my own validation logic
server-side!?” you may say. And of course you’d be right, even if you instructed
browsers to ensure only email addresses go through you can never trust user
input. However there still is something you can do to avoid having to validate
email addresses.
</p>

<p>
Just send a verification email to the address, whatever it is.
</p>

<p>
After all, what you care about is that you can communicate with your user,
right? Not that their email address obeys a regular expression? Isn’t the email
infrastructure best suited to decide what is an acceptable email address and
what is not anyway? Just send the email with a link, and if someone clicks the
link, you know the email address is good.
</p>

<p>
With this article I hope I was able to teach you something about solving
problems which at first sight involve tricky string manipulations. Though often
your trusty string functions will do the job well, there are certainly also
elegant built-in solutions for those problems which resist your string-fu!
</p>
<p class="article-date article-date-footer"><time datetime="2020-07-23">July 23, 2020</time></p>
</article>]]></content>
<author>
<name>Victor Schubert</name>
<email>v@schu.be</email>
</author>
</entry>
<entry>
<title>Fictitious phone numbers and email addresses</title>
<link href="https://schu.be/fictitious-phone-numbers-and-email-addresses.html" />
<link href="https://schu.be/fictitious-phone-numbers-and-email-addresses.html" rel="alternate" type="text/html" />
<id>https://schu.be/fictitious-phone-numbers-and-email-addresses.html</id>
<published>2020-09-23T10:00:00Z</published>
<updated>2020-09-23T10:00:00Z</updated>
<content type="html"><![CDATA[<article>
<p>
When testing software we sometimes need to create user
accounts. Who hasn’t — in this situation — mashed their keyboard to
produce a phone number, maybe tweaking it to have it be accepted by
whatever validation logic is built in the form you’re testing?
Sometimes you’re testing a live system and going for the obvious
“@email.com” address or using some random phone number means some
unsuspecting, unlucky stranger might receive some strange messages
as a collateral. This can be avoided however: some email addresses
and phone numbers are set aside for testing purposes (or something
close) and are guaranteed to never be assigned to any user. On this
page I try to summarize what email addresses and phone numbers you
can use without fear of spamming someone.
</p>

<h2 id="email-addresses">Email addresses</h2>
<p>
Actually this is the easiest one. <a href="https://tools.ietf.org/html/rfc2606">RFC 2606</a> sets aside three domain
names to be used in examples. These domains will never be used for
anything else, so it is fairly safe to assume noone will ever get
an email address with any of those domains. At least currently,
none of those has an MX record.
</p>

<ul>
<li><span class="faint">xxx</span>@example.com</li>
<li><span class="faint">xxx</span>@example.net</li>
<li><span class="faint">xxx</span>@example.org</li>
</ul>

<p>
To that list you can add subdomains to domains you control, which
<em>you</em> can decide to set aside for testing purposes: for example if
you own mycompany.xyz, you can use any @example.mycompany.xyz and
be sure that noone will ever receive those emails unless you decide
to start receiving them yourself.
</p>

<h2 id="phone-numbers">Phone numbers</h2>
<p>
Phone numbers are another story. Each country has its own numbering
plan. Numbering plans are exactly what they say they are: they are
documents defining how phone numbers work in a country: what phone
number prefixes are used how, how phone numbers are allocated to
phone service providers and end users… You may ask yourself: why
would countries bar phone numbers from ever being allocated to a
user? It turns out works of fictions often contain phone numbers,
and people tend to actually try to call those phone numbers. In
order to avoid that, phone numbering plans tend to include a few
phone numbers dedicated to works of fiction for use by authors, so
as to prevent their audience from bothering people whose phone
numbers end up in a movie. Because each country establishes its own
phone numbering plan, there isn’t an international standard for
fictitious phone numbers, so we need to dig for each country. I
will try to add this information for as many countries as I can,
which probably won’t be a lot. Expect this page to be updated.
</p>

<h3 id="australia">Australia</h3>
<p>
Australia has <a href="https://www.acma.gov.au/choose-your-phone-number">a very friendly website</a> which lists in plain
		language the phone numbers which can be used for
		fiction.
</p>

<ul>
<li>+61 2 5550 <span class="faint">XXXX</span>
(Central East, covering NSW and ACT)</li>
<li>+61 2 7010 <span class="faint">XXXX</span>
(Central East, covering NSW and ACT)</li>
<li>+61 3 5550 <span class="faint">XXXX</span>
(South East, covering VIC and TAS)</li>
<li>+61 3 7010 <span class="faint">XXXX</span>
(South East, covering VIC and TAS)</li>
<li>+61 7 5550 <span class="faint">XXXX</span>
(North East, covering QLD)</li>
<li>+61 7 7010 <span class="faint">XXXX</span>
(North East, covering QLD)</li>
<li>+61 8 5550 <span class="faint">XXXX</span>
(Central West, covering SA, WA and NT)</li>
<li>+61 8 7010 <span class="faint">XXXX</span>
(Central West, covering SA, WA and NT)</li>
<li>+61 491 570 006 (mobile)</li>
<li>+61 491 570 156 (mobile)</li>
<li>+61 491 570 157 (mobile)</li>
<li>+61 491 570 158 (mobile)</li>
<li>+61 491 570 159 (mobile)</li>
<li>+61 491 570 110 (mobile)</li>
<li>+61 491 570 313 (mobile)</li>
<li>+61 491 570 737 (mobile)</li>
<li>+61 491 571 266 (mobile)</li>
<li>+61 491 571 491 (mobile)</li>
<li>+61 491 571 804 (mobile)</li>
<li>+61 491 572 549 (mobile)</li>
<li>+61 491 572 665 (mobile)</li>
<li>+61 491 572 983 (mobile)</li>
<li>+61 491 573 770 (mobile)</li>
<li>+61 491 573 087 (mobile)</li>
<li>+61 491 574 118 (mobile)</li>
<li>+61 491 574 632 (mobile)</li>
<li>+61 491 575 254 (mobile)</li>
<li>+61 491 575 789 (mobile)</li>
<li>+61 491 576 398 (mobile)</li>
<li>+61 491 576 801 (mobile)</li>
<li>+61 491 577 426 (mobile)</li>
<li>+61 491 577 644 (mobile)</li>
<li>+61 491 578 957 (mobile)</li>
<li>+61 491 578 148 (mobile)</li>
<li>+61 491 578 888 (mobile)</li>
<li>+61 491 579 212 (mobile)</li>
<li>+61 491 579 760 (mobile)</li>
<li>+61 491 579 455 (mobile)</li>
<li>1800 160 401 (Freephone)</li>
<li>1800 975 707 (Freephone)</li>
<li>1800 975 708 (Freephone)</li>
<li>1800 975 709 (Freephone)</li>
<li>1800 975 710 (Freephone)</li>
<li>1800 975 711 (Freephone)</li>
<li>1300 975 707 (local rate)</li>
<li>1300 975 708 (local rate)</li>
<li>1300 975 709 (local rate)</li>
<li>1300 975 710 (local rate)</li>
<li>1300 975 711 (local rate)</li>
</ul>

<h3 id="france">France</h3>
<p>
The <a href="https://www.arcep.fr/">ARCEP</a> is in charge of managing France’s phone numbering
plans. In its <a href="https://www.arcep.fr/uploads/tx_gsavis/18-0881.pdf">Décision n°2018-0881 modifiée de l'Autorité de
régulation des communications électroniques et des postes en date
du 24 juillet 2018 établissant le plan national de numérotation et
ses règles de gestion</a> it allocates six blocks of 100 000 phone
numbers for works of fiction.
</p>

<ul>
<li>+33 1 99 00 <span
      class="faint">XX XX XX</span> (geographic,
Île-de-France)</li>
<li>+33 2 61 91 <span
      class="faint">XX XX XX</span> (geographic,
North-west, Réunion, Mayotte)</li>
<li>+33 3 53 01 <span
      class="faint">XX XX XX</span> (geographic,
North-east)</li>
<li>+33 4 65 71 <span
      class="faint">XX XX XX</span> (geographic,
South-east)</li>
<li>+33 5 36 49 <span
      class="faint">XX XX XX</span> (geographic,
South-west, Overseas)</li>
<li>+33 6 39 98 <span
      class="faint">XX XX XX</span> (mobile)</li>
</ul>

<h3 id="ireland">Ireland</h3>
<p>
In its <a href="https://www.comreg.ie/publication/numbering-conditions-of-use-and-application-process-document">Numbering Conditions of Use and Application Process</a>
document, the Commission for Communications Regulation sets out a
full area code for use in drama and fiction: +353 20 <span
    class="faint">XXX XX XX</span>.
</p>

<h3 id="united-kingdom">United Kingdom</h3>
<p>
The british <a href="https://www.ofcom.org.uk/">Office of Communications</a> (or <em>Ofcom</em> for short) set
aside <a href="https://www.ofcom.org.uk/phones-telecoms-and-internet/information-for-industry/numbering/numbers-for-drama#accordion__target-86530">20 blocks of 1000 phone numbers</a> for use in works of fiction.
</p>

<ul>
<li>+44 113 496 0<span class="faint">XXX</span> (Leeds)</li>
<li>+44 114 496 0<span class="faint">XXX</span> (Sheffield)</li>
<li>+44 115 496 0<span class="faint">XXX</span> (Nottingham)</li>
<li>+44 116 496 0<span class="faint">XXX</span> (Leicester)</li>
<li>+44 117 496 0<span class="faint">XXX</span> (Bristol)</li>
<li>+44 118 496 0<span class="faint">XXX</span> (Reading)</li>
<li>+44 121 496 0<span class="faint">XXX</span> (Birmingham)</li>
<li>+44 131 496 0<span class="faint">XXX</span> (Edinburgh)</li>
<li>+44 141 496 0<span class="faint">XXX</span> (Glasgow)</li>
<li>+44 151 496 0<span class="faint">XXX</span> (Liverpool)</li>
<li>+44 161 496 0<span class="faint">XXX</span> (Manchester)</li>
<li>+44 20 7946 0<span class="faint">XXX</span> (London)</li>
<li>+44 191 498 0<span class="faint">XXX</span> (Tyneside/Durham/Sunderland)</li>
<li>+44 28 9649 6<span class="faint">XXX</span> (Northern Ireland)</li>
<li>+44 29 2018 0<span class="faint">XXX</span> (Cardiff)</li>
<li>+44 1632 960<span class="faint">XXX</span> (no area)</li>
<li>+44 7700 900<span class="faint">XXX</span> (mobile)</li>
<li>+44 8081 570<span class="faint">XXX</span> (Freephone)</li>
<li>+44 909 8790<span class="faint">XXX</span> (premium)</li>
<li>+44 3069 990<span class="faint">XXX</span> (UK-wide)</li>
</ul>

<h3 id="united-states-of-america">United States of America</h3>
<p>
The United States have set aside 99 phone numbers under each area
code.  Therefore for some area code XXX you can use any phone
number in the range +1 <span
    class="faint">XXX</span>-555-0100 to +1 <span
    class="faint">XXX</span>-555-0199.
</p>
<p class="article-date article-date-footer"><time datetime="2020-09-23">September 23, 2020</time></p>
</article>]]></content>
<author>
<name>Victor Schubert</name>
<email>v@schu.be</email>
</author>
</entry>
<entry>
<title>Crypto-lingo</title>
<link href="https://schu.be/crypto-lingo.html" />
<link href="https://schu.be/crypto-lingo.html" rel="alternate" type="text/html" />
<id>https://schu.be/crypto-lingo.html</id>
<published>2021-03-23T10:00:00Z</published>
<updated>2021-03-23T10:00:00Z</updated>
<content type="html"><![CDATA[<article>
<p>
Recently I have found myself working with OpenSSL, trying to get it
to generate PKCS #7 signatures in a very particular manner. It is
not the first time I’ve had to work with this tool and its related
protocols and formats but like every time I need to work with this
I’ve had to relearn what each opaque and unpronounceable acronym
stands for and how they relate to each other. In this page I try to
summarize what each name stands for in an understandable manner so
that next time I, or anyone who stumbles upon this, need to work
again with thees tool, it will be easier to get my bearings.
</p>

<h2 id="asn1">ASN.1</h2>
<p>
ASN.1 is a language which lets standard makers describe data
structures which can be stored or exchanged. For example when the
PKCS #7 defines what a signature contains, it does that with
ASN.1. Importantly, ASN.1 does <em>not</em> define a format to actually
encode the contents of the structure; it defines only the shape of
the structure.
</p>

<h2 id="der">DER</h2>
<p>
DER is a binary format for encoding structures described by ASN.1.
Therefore, if a structure is defined by ASN.1, it can be encoded
with DER into sequences of bytes fit for saving or
exchanging. Private keys, certificates and certificate chains can
all be saved in DER format.
</p>

<h2 id="pem">PEM</h2>
<p>
PEM is base64-encoded DER with an added header and footer, such as
<code>-----<wbr>BEGIN PRIVATE KEY-----</code> (header) or <code>-----<wbr>END
   CERTIFICATE-----</code> (footer).
</p>

<h2 id="x509">X.509</h2>
<p>
X.509 defines the format and workings of the certificates used for
example by TLS and S/MIME. It uses ASN.1 to define this
formally. Notably, it defines.
</p>

<ul>
<li>What goes into a certificate signing request.</li>
<li>What goes into a certificate.</li>
<li>What goes into a certificate revocation list.</li>
<li>How certificates sign each other.</li>
<li>What makes a certificate valid.</li>
</ul>

<h2 id="pkcs7">PKCS #7</h2>
<p>
PKCS #7 is another standard that uses ASN.1 to define how to store
signed or encrypted data. Its format for storing signed data allows
storing the certificates alongside the data, and this is sometimes
used to store just certificates, by not storing any data next to
the certificates.
</p>

<h2 id="pkcs12">PKCS #12</h2>
<p>
PKCS #12 is a standard which defines how to store certificates,
certificate chains and private keys in “bundles” of cryptographic
data. It allows encryption of pieces of data, which is very useful
to encrypt private keys.
</p>
<p class="article-date article-date-footer"><time datetime="2021-03-23">March 23, 2021</time></p>
</article>]]></content>
<author>
<name>Victor Schubert</name>
<email>v@schu.be</email>
</author>
</entry>
<entry>
<title>MPRIS</title>
<link href="https://schu.be/til-mpris.html" />
<link href="https://schu.be/til-mpris.html" rel="alternate" type="text/html" />
<id>https://schu.be/til-mpris.html</id>
<published>2021-03-29T10:00:00Z</published>
<updated>2021-03-29T10:00:00Z</updated>
<content type="html"><![CDATA[<article>
<p>
The <em>Media Player Remote Interfacing Specification</em> is a D-Bus
interface for controlling media players in a standardized way. This
for example is what Gnome uses when pressing the media keys or the
play/pause buttons in the notification tray. This means that any
media player which implements this interface can be controlled in
the same manner!
</p>

<p>
An easy way to make use of MPRIS is through the <code>playerctl</code> command
which give very easy access to this interface from the command line
and most importantly, scripts. When switching from Gnome to Sway I
was able to have my headset’s buttons work to play and pause music
by configuring some bindings which call <code>playerctl</code>.
</p>

<pre class="src src-sh"><span class="src-comment-delimiter"># </span><span class="src-comment">Sway configuration for media keys</span>
bindsym XF86AudioPlay exec playerctl play-pause
bindsym XF86AudioPause exec playerctl play-pause
bindsym XF86AudioNext exec playerctl next
bindsym XF86AudioPrev exec playerctl previous
</pre>

<p>
Looking at the specification I find that this is quite a capable
protocol, allowing you to get short lists of songs, for example the
current album. It can also call up the music player’s UI, query
various attributes, start playlists…  I am very glad this protocol
exists and is so simple to use and I’m sure I’m only scraping the
surface of what this allows. To my (very relative) deception the
protocol does not seem to allow for creating completely “headless”
music players that would be controlled only through the interface,
as it doesn’t seem to allow browsing libraries.
</p>
<p class="article-date article-date-footer"><time datetime="2021-03-29">March 29, 2021</time></p>
</article>]]></content>
<author>
<name>Victor Schubert</name>
<email>v@schu.be</email>
</author>
</entry>
<entry>
<title>First experience with Gemini</title>
<link href="https://schu.be/first-experience-with-gemini.html" />
<link href="https://schu.be/first-experience-with-gemini.html" rel="alternate" type="text/html" />
<id>https://schu.be/first-experience-with-gemini.html</id>
<published>2020-10-02T10:00:00Z</published>
<updated>2020-10-02T10:00:00Z</updated>
<content type="html"><![CDATA[<article>
<p>
These last few days I’ve been playing around with a nice little
protocol called <a href="https://gemini.circumlunar.space/">Gemini</a>. It positions itself as a simpler, lightweight
and privacy-respecting counterpart to the HTML+HTTP web. I am quite
charmed by how well this protocol achieves its stated goals: two
nights of hacking away sufficed to put online my in-house server built
with OCaml and I am now in the process of adapting each page from my
website to play nice with Gemini’s constraints.
</p>

<p>
This page is a sumup of what I have done until now while playing with
Gemini, and some thoughts about the protocol and the experience I had
writing a small server for it.
</p>

<h2 id="building-the-server">Building the server</h2>
<p>
OCaml has been my go-to language for my side-projects for about a year
or two. I find it very satisfying to work with and have built quite a
few toy projects with it but never got to the point of putting any of
it into production. That’s how it tends to go with my side projects…
Anyway recently a friend of mine asked me how comfortable it was to
implement web servers in OCaml and I have been looking for an
interesting web projects to do in OCaml ever since. Turns out this
came in the form of a server which would serve my website both with
Gemini and HTTP.
</p>

<p>
My primary goal writing this server was to get something fairly stable
online fast and the simplicity of the Gemini protocol made that a
breeze! Requests contain only an URL, responses contain only a status
code, a MIME type and the body (in the case of a successful response)
and this is literally all there is to it! Additionally I decided to
experiment with having the server be a self-contained binary with no
need for file IO to load articles or anything else. (I did not bother
making it a statically linked binary though so it still has a few
dependencies.) I am writing these words in an OCaml source file and it
turns out this is far from an unpleasant experience: I was able to
make myself a “DSL” (it’s so minimal it may not even deserve that
name) and ocamlformat’s ability to wrap strings actually makes for a
decent editing experience.
</p>

<h2 id="vertical-spacing">Vertical spacing</h2>
<p>
An aspect of the Gemini markup format which surprised me is the way
empty lines are handled. Using HTML every day I would have assumed
that text lines in Gemini would each be a paragraph and expect client
to render them as such, with some vertical margins like those &lt;p&gt;
elements get by default. Turns out the specification does not say
anything like this, and even defines that blank lines should be
rendered as vertical spaces, and that multiple blank lines should not
be collapsed like I would expect to be since in HTML all adjacent
whitespaces get collapsed. After a few experiments I found a rule for
using blank lines which I found attractive enough and was delighted to
find that OCaml’s modules made it very elegant to implement it as a
functor which wraps the module I use to render my Gemini pages.
</p>

<h2 id="usage-of-tls">Usage of TLS</h2>
<p>
Gemini enforces usage of TLS. Always. I think this is the part of the
specification that was most cumbersome while developing the
server. The client I used to test my implementation did not have an
option to disable this requirement. Until I actually bake TLS support
into my server my quick-and-dirty workaround is to use socat to
terminate the TLS connections and pass them directly to the server
over the loopback.
</p>

<pre class="example">
socat \
  ssl-l:1965,reuseaddr,fork,cert=./server.pem,verify=0 \
  tcp4:127.0.0.1:1964
</pre>

<p>
This will do until I add real TLS support to my server. Until then I
won’t be able to add sessions to parts of my site which may need it,
since in Gemini those are based on client certificates and this
solution does not allow the server to be aware of those.
</p>

<p>
I am kind of annoyed that the specification has absolutely no
provisions for cases where TLS is absolutely not wanted: I wish to
make the Gemini version of my site available over Tor which makes TLS
redundant. As far as I know currently, I will need to create a
self-signed certificate for that, in order to serve the content over
TLS over Tor. I’m not really thrilled by that.
</p>

<h2 id="whats-next">What’s next</h2>
<p>
I want to make this server evolve into a piece of software that will
serve my website both over Gemini and HTTP, perhaps even Gopher! Since
rendering uses a modular design I should easily be able to render HTML
instead of Gemini markup; OCaml has nice libraries for HTTP servers
and asynchronous processing so I have all the tools I need at my
disposal. Further down the line I might try to make this server into a
<a href="https://mirage.io/">MirageOS</a> unikernel to explore that part of OCaml.
</p>
<p class="article-date article-date-footer"><time datetime="2020-10-02">October 2, 2020</time></p>
</article>]]></content>
<author>
<name>Victor Schubert</name>
<email>v@schu.be</email>
</author>
</entry>
<entry>
<title>Using Sedlex with Menhir</title>
<link href="https://schu.be/til-sedlex-and-menhir.html" />
<link href="https://schu.be/til-sedlex-and-menhir.html" rel="alternate" type="text/html" />
<id>https://schu.be/til-sedlex-and-menhir.html</id>
<published>2021-05-03T10:00:00Z</published>
<updated>2021-05-03T10:00:00Z</updated>
<content type="html"><![CDATA[<article>
<p>
One of my side projects involves parsing a very simple custom
language that encodes some data. “Great!” I thought, “A reason to
try out OCamllex and Menhir!”. These are a lexer generator and a
parser generator, respectively, for the OCaml language. OCaml
normally ships with <a href="https://ocaml.org/manual/lexyacc.html">OCamllex and OCamlyacc</a>, OCaml versions of the
lex and yacc tools from the C ecosystem. <a href="http://gallium.inria.fr/~fpottier/menhir/">Menhir</a> is an improvement
over OCamlyacc.
</p>

<p>
One shortcoming of OCamllex is that it does not support Unicode: it
operates on bytes and does not have a notion of encodings. I would
like my tool to be able to work with Unicode characters though so I
had to find a replacement for OCamllex. I don’t need to replace
Menhir because it does not care about the contents of strings: it
works directly over the tokens handed to it by the lexer.
</p>

<p>
A quick search for “unicode ocamllex” points to <a href="https://github.com/ocaml-community/sedlex">Sedlex</a>. Apart from
handling of Unicode, one of its other perks is that contrary to
OCamllex, it does not define its own syntax; instead it is
implemented as a PPX rewriter, a program which hooks into the OCaml
parser and modifies the AST there to generate code. Sedlex however
cannot work with Menhir out of the box though, because it does not
use the same abstraction of a buffer.
</p>

<p>
When OCamllex and OCamlyacc, the lexer’s state is stored in a
<code>Lexing.<wbr>lexbuf</code> record. This wouldn’t be an issue if our lexer and
compiler were built to be used in a pipeline, where we get the lexer
to lex everything, and then get the parser to iterate over a list of
tokens. This however is not how code generated by OCamllex and
Ocamlyacc operates. Rather, the compiler receives a <code>Lexing.<wbr>lexbuf</code>
and a lexer function (of type <code>Lexing.<wbr>lexbuf -&gt; token</code>) and lazily
produces the tokens as needed by the parser. This is to accomodate
cases where the <code>Lexing.<wbr>lexbuf</code> is an abstraction over something
other than a plain in-memory buffer, allowing for example to read
from a file while keeping only chunks of it in
memory. <code>Lexing.<wbr>lexbuf</code> operates on bytes, whereas
<code>Sedlexing.<wbr>lexbuf</code> operates on Unicode codepoints, rendering it
incompatible with our parser.
</p>

<p>
Thankfully, the maintainers of Menhir have thought about the case of
a lexer which does not operate on <code>Lexing.<wbr>lexbuf</code>. The
<a href="https://gitlab.inria.fr/fpottier/menhir/blob/master/lib/Convert.mli#L69"><code>MenhirLib.<wbr>Convert.<wbr>Simplified.<wbr>traditional2revised</code></a> function lets us
wrap our parser into a more convenient interface. I initially had
trouble making sense of how to use it because I was looking for a
way to adapt my byte lexbuf into a Unicode lexbuf, whereas the API
actually adapts the Parser to give it a lexer-agnostic interface.
</p>

<pre class="src src-ocaml"><span class="src-tuareg-font-lock-governing">let</span> <span class="src-function-name">ast_of_string</span> <span class="src-variable-name">string</span> =
  <span class="src-tuareg-font-lock-governing">let</span> <span class="src-variable-name">lexbuf</span> = <span class="src-tuareg-font-lock-module">Sedlexing.Utf8.</span>from_string string <span class="src-tuareg-font-lock-governing">in</span>
  <span class="src-tuareg-font-lock-governing">let</span> <span class="src-function-name">revised_lexer</span> () = <span class="src-tuareg-font-lock-module">Lexer.</span>token lexbuf <span class="src-tuareg-font-lock-governing">in</span>
  <span class="src-tuareg-font-lock-governing">let</span> <span class="src-variable-name">revised_parser</span> =
    <span class="src-tuareg-font-lock-module">MenhirLib.Convert.Simplified.</span>traditional2revised <span class="src-tuareg-font-lock-module">Parser.</span>main
  <span class="src-tuareg-font-lock-governing">in</span>
  revised_parser revised_lexer
</pre>
<p class="article-date article-date-footer"><time datetime="2021-05-03">May 3, 2021</time></p>
</article>]]></content>
<author>
<name>Victor Schubert</name>
<email>v@schu.be</email>
</author>
</entry>
<entry>
<title>Forms don’t nest</title>
<link href="https://schu.be/til-forms-dont-nest.html" />
<link href="https://schu.be/til-forms-dont-nest.html" rel="alternate" type="text/html" />
<id>https://schu.be/til-forms-dont-nest.html</id>
<published>2021-05-19T10:00:00Z</published>
<updated>2021-05-19T10:00:00Z</updated>
<content type="html"><![CDATA[<article>
<p>
Working on a side project of mine, for which I decided to use Ruby
on Rails with a Javascript-free front-end, I was recently surprised
by a behaviour of HTML forms. I wished to make a page that could
edit some record, with two submit buttons next to one another, to
submit the changes or delete the record, respectively. To that
effect, I wished to get the following markup.
</p>

<pre class="src src-html">&lt;<span class="src-function-name">form</span> <span class="src-variable-name">action</span>=<span class="src-string">"/record"</span> <span class="src-variable-name">method</span>=<span class="src-string">"post"</span>&gt;
  &lt;<span class="src-function-name">input</span> <span class="src-variable-name">type</span>=<span class="src-string">"hidden"</span> <span class="src-variable-name">name</span>=<span class="src-string">"id"</span> <span class="src-variable-name">value</span>=<span class="src-string">"42"</span>&gt;
  &lt;<span class="src-function-name">input</span> <span class="src-variable-name">type</span>=<span class="src-string">"hidden"</span> <span class="src-variable-name">name</span>=<span class="src-string">"_method"</span> <span class="src-variable-name">value</span>=<span class="src-string">"patch"</span>&gt;
  &lt;<span class="src-function-name">input</span> <span class="src-variable-name">type</span>=<span class="src-string">"text"</span> <span class="src-variable-name">name</span>=<span class="src-string">"description"</span>&gt;
  &lt;<span class="src-function-name">input</span> <span class="src-variable-name">type</span>=<span class="src-string">"submit"</span>&gt;
  &lt;<span class="src-function-name">form</span> <span class="src-variable-name">action</span>=<span class="src-string">"/record"</span> <span class="src-variable-name">method</span>=<span class="src-string">"post"</span>&gt;
    &lt;<span class="src-function-name">input</span> <span class="src-variable-name">type</span>=<span class="src-string">"hidden"</span> <span class="src-variable-name">name</span>=<span class="src-string">"id"</span> <span class="src-variable-name">value</span>=<span class="src-string">"42"</span>&gt;
    &lt;<span class="src-function-name">input</span> <span class="src-variable-name">type</span>=<span class="src-string">"hidden"</span> <span class="src-variable-name">name</span>=<span class="src-string">"_method"</span> <span class="src-variable-name">value</span>=<span class="src-string">"delete"</span>&gt;
    &lt;<span class="src-function-name">input</span> <span class="src-variable-name">type</span>=<span class="src-string">"submit"</span>&gt;
  &lt;/<span class="src-function-name">form</span>&gt;
&lt;/<span class="src-function-name">form</span>&gt;
</pre>

<blockquote class="note">
<p>
The <code>_method</code> hidden input is a Rails-specific thing: it will
override the request method as perceived by the server, so that a
POST can be interpreted by the server as a PATCH or as a
DELETE.
</p>
</blockquote>

<p>
My assumption was that I would actually have nested form, and that
activating one of the submit buttons would submit the nearest form
parent. What I got instead, was a nasty bug which had both the
“update” and “delete” button delete the record… A little bit of
research and troubleshooting later, I learned that forms must not be
nested, and that browsers actually strip out the nested forms’ tags,
so that what I could eventually see in the browser’s dev tools was
this.
</p>

<pre class="src src-html">&lt;<span class="src-function-name">form</span> <span class="src-variable-name">action</span>=<span class="src-string">"/record"</span> <span class="src-variable-name">method</span>=<span class="src-string">"post"</span>&gt;
  &lt;<span class="src-function-name">input</span> <span class="src-variable-name">type</span>=<span class="src-string">"hidden"</span> <span class="src-variable-name">name</span>=<span class="src-string">"id"</span> <span class="src-variable-name">value</span>=<span class="src-string">"42"</span>&gt;
  &lt;<span class="src-function-name">input</span> <span class="src-variable-name">type</span>=<span class="src-string">"hidden"</span> <span class="src-variable-name">name</span>=<span class="src-string">"_method"</span> <span class="src-variable-name">value</span>=<span class="src-string">"patch"</span>&gt;
  &lt;<span class="src-function-name">input</span> <span class="src-variable-name">type</span>=<span class="src-string">"text"</span> <span class="src-variable-name">name</span>=<span class="src-string">"description"</span>&gt;
  &lt;<span class="src-function-name">input</span> <span class="src-variable-name">type</span>=<span class="src-string">"submit"</span>&gt;
  &lt;<span class="src-function-name">input</span> <span class="src-variable-name">type</span>=<span class="src-string">"hidden"</span> <span class="src-variable-name">name</span>=<span class="src-string">"id"</span> <span class="src-variable-name">value</span>=<span class="src-string">"42"</span>&gt;
  &lt;<span class="src-function-name">input</span> <span class="src-variable-name">type</span>=<span class="src-string">"hidden"</span> <span class="src-variable-name">name</span>=<span class="src-string">"_method"</span> <span class="src-variable-name">value</span>=<span class="src-string">"delete"</span>&gt;
  &lt;<span class="src-function-name">input</span> <span class="src-variable-name">type</span>=<span class="src-string">"submit"</span>&gt;
&lt;/<span class="src-function-name">form</span>&gt;
</pre>

<p>
Coupled to the fact that when multiple hidden inputs share a name
the browser will use the last one defined, any request went away
with <code>_method</code> set to <code>delete</code>, and the record
would get deleted.
</p>
<p class="article-date article-date-footer"><time datetime="2021-05-19">May 19, 2021</time></p>
</article>]]></content>
<author>
<name>Victor Schubert</name>
<email>v@schu.be</email>
</author>
</entry>
<entry>
<title>Ruby class names and assignment</title>
<link href="https://schu.be/til-ruby-class-name-assignment.html" />
<link href="https://schu.be/til-ruby-class-name-assignment.html" rel="alternate" type="text/html" />
<id>https://schu.be/til-ruby-class-name-assignment.html</id>
<published>2021-07-09T10:00:00Z</published>
<updated>2021-07-09T10:00:00Z</updated>
<content type="html"><![CDATA[<article>
<p>
In general each Ruby class has a name. It can be obtained by calling
<code>Class#<wbr>name</code>. There is an exception to this however: anonymous
classes. The simplest way to create an anonymous class is through
the constructor <code>Class.<wbr>new</code>. As could be expected, anonymous
classes’ name is <code>nil</code>. This name however can’t be directly
assigned: there is no <code>Class#<wbr>name=</code>. I was surprised to learn
however, that there is still a mechanism through which a name can be
assigned to an anonymous class.  <em>Assigning an anonymous class to a
constant will assign the constant’s name as the class name.</em>
</p>

<pre class="example">
irb(main):001:0&gt; my_class = Class.new
=&gt; #&lt;Class:0x0000561172d87b40&gt;
irb(main):002:0&gt; my_class.name
=&gt; nil
irb(main):003:0&gt; MyClass = my_class
=&gt; MyClass
irb(main):004:0&gt; my_class.name
=&gt; MyClass
</pre>
<p class="article-date article-date-footer"><time datetime="2021-07-09">July 9, 2021</time></p>
</article>]]></content>
<author>
<name>Victor Schubert</name>
<email>v@schu.be</email>
</author>
</entry>
<entry>
<title>Identity of the results of Ruby conversion methods</title>
<link href="https://schu.be/til-ruby-conversion-identity.html" />
<link href="https://schu.be/til-ruby-conversion-identity.html" rel="alternate" type="text/html" />
<id>https://schu.be/til-ruby-conversion-identity.html</id>
<published>2022-11-14T10:00:00Z</published>
<updated>2022-11-14T10:00:00Z</updated>
<content type="html"><![CDATA[<article>
<p>
Ruby standard types define various conversion methods. For example
<code>Array#<wbr>to_<wbr>set</code> makes a <code>Set</code> of an <code>Array</code>, and <code>Set#<wbr>to_<wbr>a</code> makes an <code>Array</code> of
a <code>Set</code>. Some conversion methods however, don’t seem to be so useful at first
sight, such as <code>Array#<wbr>to_<wbr>a</code> and <code>Set#<wbr>to_<wbr>set</code>. These “conversion” methods are
useful because they allow code to be written to operate on a specific type,
Set for example, while still accepting anything that supports being converted
to a <code>Set</code> by defining a <code>#to_<wbr>set</code> method.
</p>

<p>
What I am wondering is: do those “no-op” or “identity” conversion operators
create a new copy of the target or do they return the target itself? One way
to find out is to use the <code>Object#<wbr>object_<wbr>id</code> method. Because this method is
defined on the <code>Object</code> class it is available on every single object. Its
return value is an integer which uniquely identifies its target. If two
objects have the same object ID, then they are one and the same. We say they
are <em>identical</em>. Two objects can be <em>equal</em> without being <em>identical</em>
however. For example, <code>[] == []</code> will be true because all empty arrays are
equal, but <code>[].<wbr>object_<wbr>id == [].<wbr>object_<wbr>id</code> will be false because these are two
distinct empty arrays which resides in two different locations in
memory. Identical objects however, are always equal, because an object is
always equal to itself.
</p>

<p>
With this out of the way, let’s get to testing.
</p>

<pre class="example">
irb&gt; ary = []
=&gt; []
irb&gt; ary.object_id
=&gt; 373620
irb&gt; ary.to_a.object_id
=&gt; 373620
</pre>

<p>
Now this shows us that <code>Array#<wbr>to_<wbr>a</code> just returns the array without making a
copy. Let’s also check <code>Set#<wbr>to_<wbr>set</code>.
</p>

<pre class="example">
irb&gt; set = Set[]
=&gt; #&lt;Set: {}&gt;
irb&gt; set.object_id
=&gt; 405360
irb&gt; set.to_set.object_id
=&gt; 405360
</pre>

<p>
This means <code>Set#<wbr>to_<wbr>set</code> also just returns the set without copying it. This is a
reasonable optimization, but it has consequences one should be aware of.
</p>

<p>
Let’s define a method that will accept any kind of collection and count how
many items are three-letter words.
</p>

<pre class="src src-ruby"><span class="src-keyword">def</span> <span class="src-function-name">three_letters_word_count</span>(collection)
  ary = collection.to_a
  ary.select! { |word| word.length == 3 }
  ary.count
<span class="src-keyword">end</span>
</pre>

<p>
This certainly isn’t the nicest implementation. We could just call <code>#count</code>
with a block that does the filtering. But this is for illustration purposes
only. Let’s test this method.
</p>

<pre class="example">
irb&gt; ary = %w[the quick brown fox jumps over the lazy dog]
=&gt; ["the", "quick", "brown", "fox", "jumps", "over", "the", "lazy", "dog"]
irb&gt; three_letters_word_count ary
=&gt; 4
irb&gt; set = Set['foo', 'bar', 'quux']
=&gt; #&lt;Set: {"foo", "bar", "quux"}&gt;
irb&gt; three_letters_word_count set
=&gt; 3
</pre>

<p>
It all looks quite reasonable until we take another look at our set and our
array after the fact.
</p>

<pre class="example">
irb&gt; ary
=&gt; ["the", "fox", "the", "dog"]
irb&gt; set
=&gt; #&lt;Set: {"foo", "bar", "quux"}&gt;
</pre>

<p>
The set is fine, but the array got mutated! This in itself is not surprising
as we know that <code>Array#<wbr>to_<wbr>a</code> did not perform a copy and the implementation of
our method mutates the array. What is surprising is that this behavior depends
on the type of the argument, since any other type of collection will get
copied into a new array which the method can safely mutate.
</p>

<p>
Just means using to_a or to_set isn’t enough if you’re planning on mutating a
copy of your argument. You need to also dup it if the type is already
correct. Or you could dup only if the result of to_a is identical to the
argument, which can be done with <code>Object#<wbr>equal?</code> which is equivalent to
checking equality of the object IDs.
</p>

<pre class="src src-ruby">ary = collection.to_a
ary = ary.dup <span class="src-keyword">if</span> ary.equal? collection
<span class="src-comment-delimiter"># </span><span class="src-comment">Mutating ary is safe here.</span>
</pre>
<p class="article-date article-date-footer"><time datetime="2022-11-14">November 14, 2022</time></p>
</article>]]></content>
<author>
<name>Victor Schubert</name>
<email>v@schu.be</email>
</author>
</entry>
</feed>
